Diferencia entre revisiones de «KiParameters/en»
Página creada con «A dialog will open to select the parameter map file, which must be in '''.xls''' or '''.ods''' (Excel or OpenDocument) format. Once located, press "'''''Open'''''".» |
Sin resumen de edición |
||
| (No se muestran 3 ediciones intermedias del mismo usuario) | |||
| Línea 2: | Línea 2: | ||
= kiParameters = | = kiParameters = | ||
''kiParameters'' is a desktop tool for '''''Windows 10''''' that facilitates the configuration of Modbus devices locally or remotely (taking advantage of the power of the kiconex libraries). | ''kiParameters'' is a desktop tool for '''''Windows 10''''' that facilitates the configuration of Modbus devices locally or remotely (taking advantage of the power of the kiconex libraries). | ||
__TOC__ | __TOC__ | ||
== Session management == | == Session management == | ||
To use the functionalities that require connection to the mykiconex platform, you must log in with your user name and password. | To use the functionalities that require connection to the mykiconex platform, you must log in with your user name and password. | ||
At startup, ''kiParameters'' will check if there is an active session. If so, it will automatically log in. If not, the following pop-up window will be displayed. If you want to use online functionalities, enter your credentials and click on the '''''"Login"''''' button. You can also check the box '''''"Remember me"''''' to keep the information for other sessions. | At startup, ''kiParameters'' will check if there is an active session. If so, it will automatically log in. If not, the following pop-up window will be displayed. If you want to use online functionalities, enter your credentials and click on the '''''"Login"''''' button. You can also check the box '''''"Remember me"''''' to keep the information for other sessions. | ||
| Línea 24: | Línea 24: | ||
[[Archivo:KiParameters_logout.gif|centro]] | [[Archivo:KiParameters_logout.gif|centro]] | ||
== Parameter map == | == Parameter map == | ||
Parameter map refers to an operating configuration applied to a control. For example, in [[MainInterphase|mykiconex]] the parameter map can be consulted and modified via the "'''''Parameters'''''" tab (see [[Controls]]). | Parameter map refers to an operating configuration applied to a control. For example, in [[MainInterphase|mykiconex]] the parameter map can be consulted and modified via the "'''''Parameters'''''" tab (see [[Controls]]). | ||
| Línea 48: | Línea 48: | ||
[[File:KiParamers_new_map.gif|center]] | [[File:KiParamers_new_map.gif|center]] | ||
<span id="Cargar_un_mapa"></span> | |||
=== Loading a map === | === Loading a map === | ||
| Línea 59: | Línea 60: | ||
[[File:KiParameters Open map.gif|center|unframed|799x799px]] | [[File:KiParameters Open map.gif|center|unframed|799x799px]] | ||
<span id="Guardar_un_mapa"></span> | |||
=== Save a map === | === Save a map === | ||
| Línea 82: | Línea 84: | ||
Continue selecting a library from those you have downloaded. (to download a library, see the section '''[https://{{SERVERNAME}}/index.php?title=KiParameters#Librer%C3%ADas Libraries]''' and click on “''''' Read device '''''”. | Continue selecting a library from those you have downloaded. (to download a library, see the section '''[https://{{SERVERNAME}}/index.php?title=KiParameters#Librer%C3%ADas Libraries]''' and click on “''''' Read device '''''”. | ||
<span id="Leer_un_mapa_a_través_de_kiconex"></span> | |||
==== Read a map through kiconex ==== | ==== Read a map through kiconex ==== | ||
| Línea 91: | Línea 94: | ||
[[File:KiParameters - Lectura local kiconex.png|center|miniaturadeimagen|366x366px|Setting up a device readout using kiconex.]] | [[File:KiParameters - Lectura local kiconex.png|center|miniaturadeimagen|366x366px|Setting up a device readout using kiconex.]] | ||
<span id="Escribir_un_mapa"></span> | |||
=== Write a map === | === Write a map === | ||
| Línea 97: | Línea 101: | ||
To send a parameter map to a control, you must load or read a parameter map and press the “'''''Write Device'''''" button. | To send a parameter map to a control, you must load or read a parameter map and press the “'''''Write Device'''''" button. | ||
<span id="Escribir_un_mapa_localmente"></span> | |||
==== Write a map locally ==== | ==== Write a map locally ==== | ||
| Línea 104: | Línea 109: | ||
In both cases, you will have the possibility to '''send all''' parameters or only those to which changes have been made (cells in '''green'''). | In both cases, you will have the possibility to '''send all''' parameters or only those to which changes have been made (cells in '''green'''). | ||
< | <span id="Escribir_un_mapa_a_través_de_kiconex"></span> | ||
==== | ==== Write a map through kiconex ==== | ||
<span style="color:#FF0000;"><strong>Unfortunately this option is not currently available</strong></span>, although you can save the map and upload it to the control remotely using mykiconex and its parameter import functionality . | |||
<span style="color:#FF0000;"><strong> | |||
=== Export map to PDF === | |||
[[File:KiParameters - PDF.png|alt=Button to export map to PDF|miniaturadeimagen|Button to export a parameter map to PDF.]] | |||
[[ | It is possible to generate a PDF file with the parameter map. Once you have loaded a map, click on “'''''Export to PDF'''''”. | ||
A pop-up window will open where you can configure the parameters of your PDF: | |||
[[File:KiParameters ExportMap ES.png|center|388x388px|miniaturadeimagen]] | |||
[[ | |||
* '''PDF path''' (required): place where you will save the generated PDF. | |||
* ''' | * '''Logo route''' (required): you can include your organization's logo in the header of the PDF. If you do not do this, the kiconex logo will be included by default. | ||
* ''' | * '''Name''': Identifier that you want to give to the parameter map. | ||
* ''' | * '''Library''': on which the map is based. | ||
* ''' | * '''Notes''': field to include text that serves as auxiliary information for the map. | ||
* ''' | * '''Optional columns''': you can optionally add two columns with the library parameter ID and its Modbus register. | ||
* ''' | |||
Once you are done, press “'''''Save'''''” button. | |||
=== Close map === | |||
= | [[File:KiParameters - Borrar mapa.png|alt=Button to close the map|miniaturadeimagen|Button to close an active parameter map.]] | ||
[[ | Restart the program view by clicking the “'''''Close Map'''''” button. | ||
== Library management == | |||
In the “'''''Libraries''''' tab you will find the actions related to the management of libraries. | |||
=== Control search engine from libraries === | |||
[[File:KiParameters - Buscador controles.png|imagethumbnail|Button to search for controls from a library.]] | |||
[[ | kiParameters allows you to locate all the controls in mykiconex that have a library loaded, so that you can easily locate and debug errors. To use this functionality you must have an active session. Click on the "'''''Control Finder'''''" button. | ||
kiParameters | |||
A pop-up window will appear with the list of libraries, search and select the one you want to consult and click on "'''''Search'''''". | |||
[[File:ES kiParameters Control Finder.png|center|imagethumbnail|440x440px|List with the libraries available for the user in ''mykiconex''.]] | |||
[[ | Another pop-up window will be created, in this case with a table showing the list of controls that have the selected library loaded in mykiconex. The information necessary to identify them on the platform will appear in the list: | ||
[[File:ES kiParameters Control Finder Table.png|center|imagethumbnail|500x500px|List with the results in the control finder by library.]] | |||
[[ | |||
===Export and import libraries=== | |||
If you have an active kiconex session and access to the libraries, you will be able to see the list of libraries available in kiconex on the right. Otherwise, it will be disabled. You can download them by selecting them and pressing the download button. It will appear in the list on the right when the download is complete. | |||
This list shows the libraries that kiParameters has available. The buttons on the right are used to manage them, among which the export buttons stand out (generates a file in '''JSON format''' with all the data in the library) and the import button (which supports this type of files and includes it in kiParameters). | |||
The libraries that are downloaded will be those that are available for reading and loading the parameter map when the program is in offline mode. | |||
[[File:ES kiParameters Libraries Lists.png|center|imagethumbnail|800x800px]] | |||
[[ | == Modbus Test == | ||
== Test | |||
This tab, as its name indicates, is used to make Modbus requests, either locally or remotely. First, you must configure the communication parameters: | |||
*If connecting locally: | |||
* | ** RTU: port (see “Device Manager” for correct one), Modbus address, speed, data bits, parity type and number of stop bits. | ||
** RTU: | ** TCP: IP address and port. | ||
** TCP: | <gallery perrow="2" widths="400" heights="200" caption="Configuring a Modbus test locally using RTU (left) or TCP (right)."> | ||
<gallery perrow="2" widths="400" heights="200" caption=" | File:KiParameters - Test Modbus Local RTU.png | ||
File:KiParameters - Test Modbus Local TCP.png | |||
</gallery> | </gallery> | ||
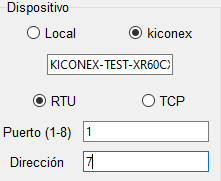
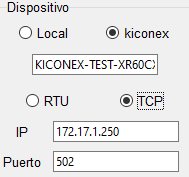
* | *Through kiconex, select the facility and for: | ||
** RTU: | ** RTU: The port index and Modbus address. | ||
** TCP: | ** TCP: IP address and port. | ||
<gallery widths="400" heights="200" perrow="2" caption=" | <gallery widths="400" heights="200" perrow="2" caption="Configuring a Modbus test remotely using RTU (left) or TCP (right)."> | ||
File:KiParameters - Test Modbus kiconex RTU.png | |||
File:KiParameters - Test Modbus kiconex TCP.png | |||
</gallery> | </gallery> | ||
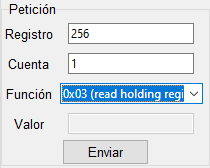
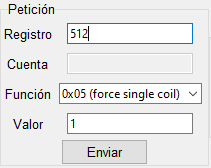
Then, configure the request: Modbus register where the query starts, number of registers to query and Modbus function to be used. If the function is a write function, the “Value” field will be enabled to indicate the value to be written. | |||
<gallery widths="400" heights="200" perrow="2" caption="Configuration of a Modbus test remotely via RTU (left) or TCP (right)."> | |||
</gallery> | File:KiParameters - Test Modbus Read Request.png | ||
[[ | File:KiParameters - Test Modbus Write Request.png | ||
</gallery> | |||
Once the request is ready, click send. If everything went well, the response will be displayed in different formats. Otherwise, it will show that there has been an error in the reading. | |||
[[File:KiParameters - Test Modbus Response.png|center|frame]] | |||
== Data export == | |||
This functionality replicates the mykiconex Reports functionality, to be able to export the data collected and saved on the platform into spreadsheets. Select the time range you want to consult. | |||
[[File:KiParameters - Report Date.png|center|frame]] | |||
[[ | Select facility, control and add the variables for which you want to obtain data. You will be able to select several at the same time and even several from different controls and facilities, '''but not from different time ranges'''. | ||
[[File:ES kiParameters Export Data Select Variables.png|center|800x800px|imagethumbnail]] | |||
[[ | The added variables will appear in the table below, you can select and delete or export the data. A dialog will appear to locate and name the file. | ||
[[File:ES kiParameters Export Data Export or Delete.png|center|imagethumbnail|800x800px]] | |||
[[ | |||
== Settings == | |||
In this tab you can modify the default configuration of Modbus communications. The configuration you save will be the one that will automatically appear in the pop-ups of the Map tab or the Modbus Test tab. | |||
[[File:ES kiParameters Configuration.png|center|imagethumbnail|400x400px]] | |||
[[ | |||
== Update kiParameters == | |||
You can check the version you have installed in the '''Help / About...''' section in the application itself. If you have an obsolete version and want to update the program with a new version, you must follow the following steps: | |||
# In '''Control Panel / Programs / Programs and Features''' a list will appear with all the programs installed on your computer. Right click on kiParameters and select "Uninstall". | |||
# | # A confirmation window will appear. Press "'''Yes'''". | ||
# | # When the process finishes, proceed to run the new version installer. | ||
# | |||
== Bug report == | |||
To communicate problems or suggestions for the program to the kiconex team, send a message to [mailto:support@kiconex.com our support team] or generate a request at [https://support.kiconex.com our support platform] . | |||
Include the following in your message: | |||
# Tab where it occurred. | |||
# | # Steps taken to generate the error (if possible). | ||
# | # If any mykiconex functionality was used, indicate library or facility and control. | ||
# | # Screenshot of the terminal window that opens when the program is run. | ||
# | |||
{{DEFAULTSORT:kiParameters}} | {{DEFAULTSORT:kiParameters}} | ||
Revisión actual - 06:51 28 ago 2024
kiParameters
kiParameters is a desktop tool for Windows 10 that facilitates the configuration of Modbus devices locally or remotely (taking advantage of the power of the kiconex libraries).
Session management
To use the functionalities that require connection to the mykiconex platform, you must log in with your user name and password. At startup, kiParameters will check if there is an active session. If so, it will automatically log in. If not, the following pop-up window will be displayed. If you want to use online functionalities, enter your credentials and click on the "Login" button. You can also check the box "Remember me" to keep the information for other sessions.

If you want to use the software in offline mode, click on the button "Continue offline". If you do not want the login dialog to appear again the next time you start the program, select the check box "Do not ask again".

Once the session is (or is not) logged in, the session information will be displayed in lower right corner.
When a change in the session is needed, click on the "Session" menu in top bar. To log out and activate the offline mode, click on "Logout". If you wish to log in with another user, click on "Login" and the program will automatically close the current session and the pop-up window will be shown again.

Parameter map
Parameter map refers to an operating configuration applied to a control. For example, in mykiconex the parameter map can be consulted and modified via the "Parameters" tab (see Controls).
This configuration could be exported for modification in a spreadsheet editor and imported back to the platform, allowing the modification of configurations remotely or even the generation and resetting of factory settings, although by itself it has two drawbacks:
- If you modify a parameter with metadata, you must first know the values that correspond to the different options.
- You cannot upload these settings to a controller that you have connected directly to the network or to the computer. We depend on a kibox or it must be done manually on the machine, parameter by parameter.
kiParameters aims to make up for these shortcomings by making the process more automatic and simple.
When loading/reading a parameter map the result will be displayed as a table with the values read from the file or control, where the only editable column is the Value column.
- Cells in white color are parameters with numeric values, double click on them to edit them and press Enter to make the change.
- Cells in color blue are parameters with metadata, click on them to show the option list and select the value desired to be changed.
- Cells in color red are parameters outside the range configured in the library.
Making a change to a cell, if it is within the range set in the Min. and Max. columns, it will become green which means the value cell has changed successfully. Otherwise, it will turn red and will be ignored in write operations on controls for security reasons.
Initially, the parameter map will be sorted ascending by the ID column. Even so, it is possible to reorder the map to your liking by left clicking on the name of any column.
New map
A new parameter map can be created by clicking the "New" option. In the dialog, select the library on which the new map will be based (you will need to have it downloaded previously).

Loading a map

To load a map from a parameter map file, simply click in "Load map".
A dialog will open to select the parameter map file, which must be in .xls or .ods (Excel or OpenDocument) format. Once located, press "Open".
Initially, kiParameters will search for the library corresponding to the map among those that are downloaded and, if it cannot find it and have a connection, among those that are hosted on the mykiconex platform.
For the most efficient operation possible, previously download or import the libraries you use most frequently. See how to do it in the section Libraries.

Save a map

Once a map has been loaded and modified, you can generate a spreadsheet file by clicking on “Save Map".
It will create an Excel or OpenDocument file (.xls or .ods, by your election) that can be uploaded back to kiParameters to modify it again, or uploaded to mykiconex to apply the configuration to a remote facility.

Read a map from a control

Click on “Read device” to load a parameter map from a device, not a file.
Read a map locally
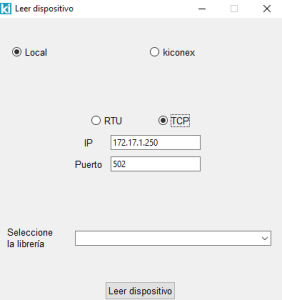
Select the “Local” option and the Modbus mode in which you want to perform the reading (Modbus RTU or Modbus TCP). You will need to fill out the communication settings to continue:
- If you select "RTU", choose the serial port (check which one is correct in Windows “Device Manager”), the Modbus address of the control, the speed, the message size , the type of parity and the number of stop bits.
- If you select "TCP", include the IP address and port.
- Setting up a device readout using Modbus RTU (left) or TCP (right).
-

-


Continue selecting a library from those you have downloaded. (to download a library, see the section Libraries and click on “ Read device ”.
Read a map through kiconex
This option allows you to load a parameter map without having to download a spreadsheet from mykiconex.
Select “kiconex” and click on the facilities entry, a list will appear with all the facilities to which the user has access, select the desired one.
Click on the controls entry and, in the same way, select from the list the control from which you want to read the parameter map and press the “Read device" button.

Write a map

To send a parameter map to a control, you must load or read a parameter map and press the “Write Device" button.
Write a map locally
As in the map reading functionality, select the Modbus mode in which you want to perform the reading (Modbus RTU or Modbus TCP). You will need to fill out the communication settings to continue:
- If you select RTU, choose the serial port (check which one is correct in Windows “Device Manager”), the Modbus address of the control, the speed, the message size, the parity type and the number of stop bits .
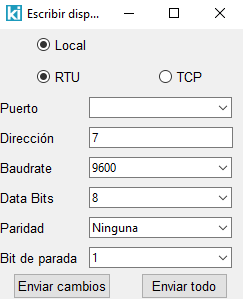
Configuring a device write using Modbus RTU. - If you select TCP, include the IP address and port.

In both cases, you will have the possibility to send all parameters or only those to which changes have been made (cells in green).
Write a map through kiconex
Unfortunately this option is not currently available, although you can save the map and upload it to the control remotely using mykiconex and its parameter import functionality .
Export map to PDF

It is possible to generate a PDF file with the parameter map. Once you have loaded a map, click on “Export to PDF”.
A pop-up window will open where you can configure the parameters of your PDF:

- PDF path (required): place where you will save the generated PDF.
- Logo route (required): you can include your organization's logo in the header of the PDF. If you do not do this, the kiconex logo will be included by default.
- Name: Identifier that you want to give to the parameter map.
- Library: on which the map is based.
- Notes: field to include text that serves as auxiliary information for the map.
- Optional columns: you can optionally add two columns with the library parameter ID and its Modbus register.
Once you are done, press “Save” button.
Close map

Restart the program view by clicking the “Close Map” button.
Library management
In the “Libraries tab you will find the actions related to the management of libraries.
Control search engine from libraries
 kiParameters allows you to locate all the controls in mykiconex that have a library loaded, so that you can easily locate and debug errors. To use this functionality you must have an active session. Click on the "Control Finder" button.
A pop-up window will appear with the list of libraries, search and select the one you want to consult and click on "Search".

Another pop-up window will be created, in this case with a table showing the list of controls that have the selected library loaded in mykiconex. The information necessary to identify them on the platform will appear in the list:

Export and import libraries
If you have an active kiconex session and access to the libraries, you will be able to see the list of libraries available in kiconex on the right. Otherwise, it will be disabled. You can download them by selecting them and pressing the download button. It will appear in the list on the right when the download is complete.
This list shows the libraries that kiParameters has available. The buttons on the right are used to manage them, among which the export buttons stand out (generates a file in JSON format with all the data in the library) and the import button (which supports this type of files and includes it in kiParameters).
The libraries that are downloaded will be those that are available for reading and loading the parameter map when the program is in offline mode.

Modbus Test
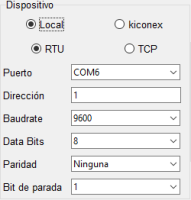
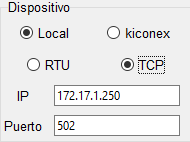
This tab, as its name indicates, is used to make Modbus requests, either locally or remotely. First, you must configure the communication parameters:
- If connecting locally:
- RTU: port (see “Device Manager” for correct one), Modbus address, speed, data bits, parity type and number of stop bits.
- TCP: IP address and port.
- Configuring a Modbus test locally using RTU (left) or TCP (right).
-
-


- Through kiconex, select the facility and for:
- RTU: The port index and Modbus address.
- TCP: IP address and port.
- Configuring a Modbus test remotely using RTU (left) or TCP (right).
-
-


Then, configure the request: Modbus register where the query starts, number of registers to query and Modbus function to be used. If the function is a write function, the “Value” field will be enabled to indicate the value to be written.
- Configuration of a Modbus test remotely via RTU (left) or TCP (right).
-
-


Once the request is ready, click send. If everything went well, the response will be displayed in different formats. Otherwise, it will show that there has been an error in the reading.

Data export
This functionality replicates the mykiconex Reports functionality, to be able to export the data collected and saved on the platform into spreadsheets. Select the time range you want to consult.

Select facility, control and add the variables for which you want to obtain data. You will be able to select several at the same time and even several from different controls and facilities, but not from different time ranges.

The added variables will appear in the table below, you can select and delete or export the data. A dialog will appear to locate and name the file.

Settings
In this tab you can modify the default configuration of Modbus communications. The configuration you save will be the one that will automatically appear in the pop-ups of the Map tab or the Modbus Test tab.

Update kiParameters
You can check the version you have installed in the Help / About... section in the application itself. If you have an obsolete version and want to update the program with a new version, you must follow the following steps:
- In Control Panel / Programs / Programs and Features a list will appear with all the programs installed on your computer. Right click on kiParameters and select "Uninstall".
- A confirmation window will appear. Press "Yes".
- When the process finishes, proceed to run the new version installer.
Bug report
To communicate problems or suggestions for the program to the kiconex team, send a message to our support team or generate a request at our support platform .
Include the following in your message:
- Tab where it occurred.
- Steps taken to generate the error (if possible).
- If any mykiconex functionality was used, indicate library or facility and control.
- Screenshot of the terminal window that opens when the program is run.