Actualizando para coincidir con nueva versión de la página fuente
(No se muestran 11 ediciones intermedias de otro usuario)
Línea 1:
Línea 1:
= Controls
= Controls =
This category allows direct access to all the controls belonging to a facility. It displays information about the name of the control, the status (On, Off, and/or alarmed), and the main probe (the most "important" variable of the control).
This category allows direct access to all the controls belonging to a facility. It displays information about the name of the control, the status (On, Off, and/or alarmed), and the main probe (the most "important" variable of the control).
__TOC__
__TOC__
== List of controls ==
== List of controls ==
To see the list of controls available in a facility, you must first access the facility, and then enter the "Controls" subsection.
To see the list of controls available in a facility, you must first access the facility, and then enter the "Controls" subsection.
On the other hand, at top right there is some icons used for the following functions:
On the other hand, at top right there is some icons used for the following functions:
* '''Ports:''' This icon in the shape of an "i" shows additional information about the protocol configuration, port and address assigned to each control. By clicking on this icon you can show or hide this information.
* '''Ports:''' This icon in the shape of an "i" shows additional information about the protocol configuration, port and address assigned to each control. By clicking on this icon you can show or hide this information.
* '''Connected:''' This plug-shaped icon is used to filter the controls that are connected, disconnected or all. This icon has three colors, depending on how many times it has been clicked:
* '''Connected:''' This plug-shaped icon is used to filter the controls that are connected, disconnected or all. This icon has three colors, depending on how many times it has been clicked:
Línea 27:
Línea 29:
** '''Green''': shows only the connected controls.
** '''Green''': shows only the connected controls.
** '''Red''': shows only the disconnected controls.
** '''Red''': shows only the disconnected controls.
* '''Grid:''' This icon is used to change the representation of the controls' list. You can select between a list or a grid view.
* '''Grid:''' This icon is used to change the representation of the controls' list. You can select between a list or a grid view.
* '''More:''' The icon '''+''' is used to add a new control.
* '''More:''' The icon '''+''' is used to add a new control.
* '''Magnifying glass':'' This icon is used to search for a control in the text. The search for the control is performed taking into account the name and the description of the control.
* '''Magnifying glass:''' This icon is used to search for a control in the text. The search for the control is performed taking into account the name and the description of the control.
Right-clicking on a control opens a drop-down menu with the following quick configuration options.
Right-clicking on a control opens a drop-down menu with the following quick configuration options.
[[Archivo:Captura3.png|centro|miniatureimage|800x800px]]These options, plus others, can also be found by clicking on the 3 configuration points located to the right of each row of a control. The "Duplicate" option allows you to duplicate the control in cases where there are two machines that are the same, to avoid having to create a new control and to take advantage of a control that has already been created and configured.
[[File:Controls - 006.png|centro|miniatureimage|800px]]These options, plus others, can also be found by clicking on the 3 configuration points located to the right of each row of a control. The "Duplicate" option allows you to duplicate the control in cases where there are two machines that are the same, to avoid having to create a new control and to take advantage of a control that has already been created and configured.
== Sections of a control ==
== Sections of a control ==
[[Archivo:Captura4.png|centro|miniatureimage|800x800px]]Accessing a control will have the following sections, each represented by a tab:
[[File:Controls - 007.png|centro|miniatureimage|800px]]Accessing a control will have the following sections, each represented by a tab:
* '''SIMPLE VIEW'''. This tab shows the variables selected as "most important" (assigned as "B" in the view configuration) and are the first to be displayed when entering the control tab.
* '''SIMPLE VIEW'''. This tab shows the variables selected as "most important" (assigned as "B" in the view configuration) and are the first to be displayed when entering the control tab.
Línea 54:
Línea 56:
* '''General tab'''. This tab is for configuring the facility's name and description, in the different platform languages. In order to identify the control, an image can be assigned to the control. Finally, the control can be enabled or disabled.
* '''General tab'''. This tab is for configuring the facility's name and description, in the different platform languages. In order to identify the control, an image can be assigned to the control. Finally, the control can be enabled or disabled.
* '''Protocol tab'''. This tab is for configuring the protocol and the relevant parameters used by the control to communicate with kiBox. If a new control is being created, the first thing we will be asked to do is to select among the different protocols allowed by the kiBox purchased for this facility.
* '''Protocol tab'''. This tab is for configuring the protocol and the relevant parameters used by the control to communicate with kiBox. If a new control is being created, the first thing we will be asked to do is to select among the different protocols allowed by the kiBox purchased for this facility.
* '''Actions tab'''. This tabs has the following commands:
* '''Actions tab'''. This tabs has the following commands:
Línea 65:
Línea 67:
** '''Test modbus'''. This button opens a pop-up screen to make requests through the fieldbus on that control to the register address specified.
** '''Test modbus'''. This button opens a pop-up screen to make requests through the fieldbus on that control to the register address specified.
<div lang="es" dir="ltr" class="mw-content-ltr">
[[File:Controls - 010.png|alt=Edit control - actions tab|centro|miniatureimage|800px|Edit control - actions tab]]
[[Archivo:SP editar control acciones.jpg|alt=Editar control - pestaña acciones|centro|miniaturadeimagen|800x800px|Editar control - pestaña acciones]]
</div>
<div lang="es" dir="ltr" class="mw-content-ltr">
* '''Access API tab'''.
* '''Pestaña Acceso API'''.
* '''Permissions tab'''. It is used to assign permissions to users as indicated in the section.
* '''Pestaña Permisos'''. Sirve para asignar permisos a los usuarios según se indica en el apartado <br />
</div>
<div lang="es" dir="ltr" class="mw-content-ltr">
== Permissions on controls ==
== Permisos sobre controles ==
Ways to access to the permissions of a control: by right clicking on the control and selecting "assign permissions"; by clicking on the 3 dots to the right of the control and selecting "assign permissions" or by editing the control and selecting the "permissions" tab.[[File:Controls - 011.png|centro|miniaturadeimage|800px]]
Se puede acceder a los permisos de un control de varias formas: pulsando botón derecho sobre el control y seleccionando "asignar permisos", pulsando sobre los 3 puntos a la derecha del control y seleccionar "asignar permisos" o editando el control y seleccionando la pestaña "permisos".[[Archivo:Captura8.png|centro|miniaturadeimagen|800x800px]]
</div>
<div lang="es" dir="ltr" class="mw-content-ltr">
When creating any new item, it inherits the same permissions as the facility, except for "execute commands", "change settings" or "change configuration", as these do not exist in the facility.
Al crear algún elemento nuevo, éste hereda los mismos permisos que la instalación, a excepción de "ejecutar comandos", "cambiar ajustes" o "cambiar configuración", ya que estos no existen en la instalación.
[[Archivo:SP - Panel de configuración de permisos.png|centro|miniaturadeimagen|800x800px|Panel de configuración de permisos]]
Each user or group is displayed in a row. The permissions available to each control and their implication are detailed below:
Cada usuario o grupo se muestra en una fila. Los permisos que dispone cada control y su implicación se detallan a continuación:
</div>
<div lang="es" dir="ltr" class="mw-content-ltr">
# '''View''': Allows the visualization on the object or control appearing to the user in the list of controls.
# '''Ver''': Permite la visualización sobre el objeto o control. Es decir, le aparece al usuario en el listado de controles.
</div>
<div lang="es" dir="ltr" class="mw-content-ltr">
# '''Edit''': Allows editing of the object or control. The "pencil" icon is available to edit the object's properties.
# '''Editar''': Permite la edición del objeto o control. Esto implica que puede acceder al icono del "lápiz" para editar las propiedades del objeto.
# '''Delete''': Allows deleting the object. The user must have the delete permission on the facility permissions.
# '''Eliminar''': Permite eliminar el objeto, siempre que tenga el permiso de eliminar sobre los permisos de la instalación.
# '''Create''': Allows creating the object or on it, the user must have the create permission on the facility permissions.
# '''Crear''': Permite crear el objeto o en él, siempre que tenga el permiso de crear sobre los permisos de la instalación.
# '''Execute commands''': Allows to execute commands on the control. Only available to see if the user has the proper permission on the facility permissions.
# '''Ejecutar comandos''': Permite ejecutar comandos sobre el control. Si no tiene este permiso no podrá ver la pestaña de comandos>comandos.
# '''Change settings''': Allows to change settings or commands on the control. Only available to see if the user has the proper permission on the facility permissions.
# '''Cambiar ajustes''': Permite cambiar ajustes o consignas sobre el control. Si no tiene este permiso no podrá ver la pestaña de comandos>Ajustes.
# '''Change configuration''': Allows to change the configuration of the control, accessing and modifying the "Parameters" tab.
# '''Cambiar configuración''': Permite cambiar la configuración sobre el control. Es decir, acceder y modificar a la pestaña de "Parámetros".
</div>
<div lang="es" dir="ltr" class="mw-content-ltr">
These permissions apply only to the selected control. If the same permission settings of an user in several or all the controls needs to be propagated settings, right click on the name of the user or group that you want to propagate the permissions and select the "Propagate" option. This will copy the permission settings of that user in that control to all the controls that have been previously selected.
Estos permisos aplican sólo sobre el control seleccionado. Si se requiere propagar la misma configuración de permisos de un usuario en varios o todos los controles, se debe hacer click con el botón derecho sobre el nombre del usuario o grupo que se desea propagar los permisos y seleccionar la opción "Propagar". Así la configuración de permisos de ese usuario en ese control se copiará a todos los controles que se han seleccionado previamente.
[[File:Controls - 013.png|centro|miniatureimage|800px|Propagate option in the permissions configuration panel]]
[[Archivo:SP - Opción propagar en panel de configuración de permisos.png|centro|miniaturadeimagen|800x800px|Opción propagar en panel de configuración de permisos]]
</div>
<div lang="es" dir="ltr" class="mw-content-ltr">
== Managing the view and control templates ==
== Gestión de la vista y las plantillas de los controles ==
</div>
<div lang="es" dir="ltr" class="mw-content-ltr">
=== View configuration ===
=== Configuración de la vista ===
The view of a control is the definition for each control variable of its: visibility, location, description, sampling time and alarm level.
La vista de un control es la definición para cada variable del control de su: visibilidad, ubicación, descripción, tiempo de muestreo y nivel de alarma.
</div>
<div lang="es" dir="ltr" class="mw-content-ltr">
To access the view configuration it is necessary to enter the control and click on the cogwheel that appears in the last tab on the right.[[File:Controls - 014.png|centro|miniatureimage|800px]]In the screen to edit the view you can see the following sections:
Para acceder a la configuración de la vista es necesario entrar en el control y pulsar sobre la rueda dentada que aparece en la última pestaña de la derecha.[[Archivo:Captura4.png|centro|miniaturadeimagen|800x800px]]En la pantalla para editar la vista se pueden observar las siguientes secciones:
[[File:Controls - 015.png|alt=Configuration view of a control|centro|miniaturadeimage|800px|Configuration view of a control]]
[[Archivo:Configuración vista de un control.jpg|alt=Configuración vista de un control|centro|miniaturadeimagen|800x800px|Configuración vista de un control]]
The variables of the control are grouped by their different categories: analog inputs, analog outputs, digital inputs, etc. From the drop-down menu at the top right you can select the groups of variables to be filtered.
Las variables del control están agrupadas por sus diferentes categorías: entradas analógicas, salidas analógicas, entradas digitales...etc. Desde el desplegable situado arriba a la derecha se pueden seleccionar los grupos de variables que se desean filtrar.
</div>
<div lang="es" dir="ltr" class="mw-content-ltr">
When editing the view of a variable, a drop-down menu appears as shown in the following image:
Cuando se edita la vista de una variable aparece un desplegable como el de la siguiente imagen:
[[File:Controls - 016.png|alt=Detail of variable view configuration|centro|miniatureimage|800px|Detail of variable view configuration]]
[[Archivo:SP detalle configuración vista control.jpg|alt=Detalle configuración vista variable|centro|miniaturadeimagen|800x800px|Detalle configuración vista variable]]
'''NAME''': Allows to change variable name.
'''NOMBRE'''. En ella se puede modificar el nombre de la variable
</div>
<div lang="es" dir="ltr" class="mw-content-ltr">
'''DESCRIPTION''': Allow to add or modify the description that will appear according to the different languages that have been configured on the platform.
'''DESCRIPCIÓN''' También es posible modificar la descripción que aparecerá según los diferentes idiomas que se hayan configurado en la plataforma.
</div>
<div lang="es" dir="ltr" class="mw-content-ltr">
'''ALARM LEVEL''': It only appear for variables categorized as alarms. It indicates the alarm level to be assigned if such an alarm occurs in the control:
'''NIVEL DE ALARMA''' Esto sólo aparecerá en las variables categorizadas como alarmas. Se indica el nivel de alarma que se debe asignar si se produce dicha alarma en el control:
</div>
<div lang="es" dir="ltr" class="mw-content-ltr">
* None
* Ninguno
* Low
* Bajo
* Medium
* Medio
* High
* Alto
* Critical
* Crítico
</div>
<div lang="es" dir="ltr" class="mw-content-ltr">
'''INTERVAL''': Allows to indicate the recording interval in seconds. If the value 0 is assigned, this variable will not be recorded in the database, so it will not be possible to save its history or to graph it. It is recommended not to use recording intervals of less than 10 seconds; 60 seconds or more is recommended.
'''INTERVALO''' También se puede indicar el intervalo de registro en segundos. Si se asigna el valor 0 esa variable no se registrará en la base de datos, por lo cual no se podrá guardar su histórico ni se podrá graficar. Se recomienda no utilizar intervalos de grabado inferiores a 10 segundos, incluso lo recomendable serían 60 segundos o mayores.
</div>
<div lang="es" dir="ltr" class="mw-content-ltr">
'''VISIBILITY''': The visibility of the variable on the platform must be indicated:
'''VISIBILIDAD''' Por último se debe de indicar la visibilidad de la variable en la plataforma:
</div>
<div lang="es" dir="ltr" class="mw-content-ltr">
* '''Eye crossed out'''. Indicates that this variable is not visible on the platform and therefore is not registered by the ''kiBox'' so is not requested through the fieldbus. The variable does not participate in the supervision.
* '''Ojo tachado'''. Indica que esa variable no es visible en la plataforma por lo cual tampoco es registrada por el ''kiBox'' y no se solicita a través del bus de campo. La variable no participa en la supervisión.
* '''Normal eye'''. The variable participates in the supervision. It does not appear in the simple view or in the extended view.
* '''Ojo normal'''. La variable participa en la supervisión. No aparece en la vista simple ni en la vista extendida.
* '''Eye B'''. The variable participates in the supervision and will also appear in the simple view list (basic view).
* '''Ojo B'''. La variable participa en la supervisión y además se aparecerá en el listado de vista simple (vista básica).
* '''Eye 1'''. The variable participates in the supervision and is also visible as the main variable in the controls list. It is also the one plotted as the main variable in the simple view.
* '''Ojo 1'''. La variable participa en la supervisión y además es visible como variable principal en el listado de controles. También es la graficada como variable principal en la vista simple.
</div>
<div lang="es" dir="ltr" class="mw-content-ltr">
If several variables are selected at the same time on the variable list and "edit" is selected with the right button, a specific configuration can be applied to all these variables.
Si sobre el listado de variable se seleccionan varias a la vez y se selecciona "editar" con el botón derecho, se podrá aplicar una configuración determinada a todas estas variables.
</div>
<div lang="es" dir="ltr" class="mw-content-ltr">
Once all the variables have been configured, click on the "save" button for the final configuration to take effect.
Una vez configuradas todas las variables se debe pulsar sobre el botón "guardar" para que surja efecto la configuración final.
</div>
<div lang="es" dir="ltr" class="mw-content-ltr">
=== Template management ===
=== Gestión de plantillas ===
Once a given view has been configured, it can be saved for reuse in the same or another control using the same library.
Una vez configurada una vista determinada, ésta se podrá guardar para ser reutilizada en el mismo u otro control que utilice la misma librería.
</div>
<div lang="es" dir="ltr" class="mw-content-ltr">
To manage these templates, click on the 3 dots at the top right, next to the magnifying glass icon.
Para gestionar estas plantillas se debe pulsar sobre los 3 puntos que aparecen arriba a la derecha, al lado del icono de la lupa.
[[File:Controls - 017.png|alt=Configuration view of a control|centro|miniatureimage|800px|Configuration view of a control]]
[[Archivo:Configuración vista de un control.jpg|alt=Configuración vista de un control|centro|miniaturadeimagen|800x800px|Configuración vista de un control]]
The options that will appear are the following:
Las opciones que aparecerán son las siguientes:
</div>
<div lang="es" dir="ltr" class="mw-content-ltr">
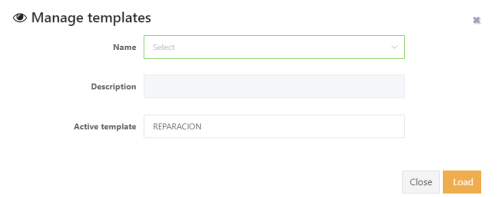
* '''Save template''': Allows saving the configuration of the current control view. Once clicked, the following pop-up window will appear, where it has to be indicated the name is wanted to be given to the new template. Selecting the name of an existing template will overwrite it. [[File:Controls - 018.png|alt=Manage templates|centro|miniatureimage|500x500px|Manage templates]]The "description" field is used to add information about the template. The '''Active template''' field identifies the current template that the control is using to render its view.
* '''Guardar plantilla''' Esta opción se usa para guardar la configuración de la vista actual de un control. Al pulsar aparecerá la siguiente ventana emergente, donde se deberá indicar el nombre que se le quiere dar a la nueva plantilla. También se podrá seleccionar el nombre de una plantilla existe para poder sobreescribirla. [[Archivo:SP administrar plantillas.jpg|alt=Administrar plantillas|centro|miniaturadeimagen|500x500px|Administrar plantillas]]El campo "descripción" se utiliza para añadir información sobre la plantilla. En el campo "Plantilla activa" se identifica la plantilla actual que está utilizando el control para representar su vista.
* '''Delete template''': Allows the deletion of an existing template.
* '''Eliminar plantilla''' Se puede seleccionar si lo que se quiere es eliminar una plantilla existente.
* '''Load template''': Allows the loading of an existing template in the current control.
* '''Cargar plantilla''' Se utiliza para cargar una plantilla existente en el control actual.
</div>
<div lang="es" dir="ltr" class="mw-content-ltr">
There is an option in the controls list that allows to load templates at the same time in several controls. Select the controls, right click on the mouse and select "load templates".
Existe una opción en el listado de controles donde podemos seleccionar varios controles, hacer click sobre el botón derecho, y seleccionar "cargar plantillas" con el objetivo de aplicar una plantilla a varios controles a la vez.[[Archivo:Captura9.png|centro|miniaturadeimagen|800x800px]]
This category allows direct access to all the controls belonging to a facility. It displays information about the name of the control, the status (On, Off, and/or alarmed), and the main probe (the most "important" variable of the control).
To see the list of controls available in a facility, you must first access the facility, and then enter the "Controls" subsection.
miniatureimage
When accessing, a list of controls can be displayed. If any of them are available, it will be displayed:
The name and description of the control.
The state it has (Connected, Disconnected, and/or with alarms).
The main probe (the most "important" variable of the control).
Otherwise, a new control can be created by clicking on the icon + (see section Create and edit a control).
miniatureimage
On the other hand, at top right there is some icons used for the following functions:
Ports: This icon in the shape of an "i" shows additional information about the protocol configuration, port and address assigned to each control. By clicking on this icon you can show or hide this information.
miniatureimage
Disabled: This icon in the form of a crossed-out circle is used to filter only the controls that are disabled.
miniatureimage
Connected: This plug-shaped icon is used to filter the controls that are connected, disconnected or all. This icon has three colors, depending on how many times it has been clicked:
Gray: shows all controls regardless of being connected or disconnected.
Green: shows only the connected controls.
Red: shows only the disconnected controls.
miniatureimage
Grid: This icon is used to change the representation of the controls' list. You can select between a list or a grid view.
More: The icon + is used to add a new control.
Magnifying glass: This icon is used to search for a control in the text. The search for the control is performed taking into account the name and the description of the control.
Right-clicking on a control opens a drop-down menu with the following quick configuration options.
miniatureimage
These options, plus others, can also be found by clicking on the 3 configuration points located to the right of each row of a control. The "Duplicate" option allows you to duplicate the control in cases where there are two machines that are the same, to avoid having to create a new control and to take advantage of a control that has already been created and configured.
Sections of a control
miniatureimage
Accessing a control will have the following sections, each represented by a tab:
SIMPLE VIEW. This tab shows the variables selected as "most important" (assigned as "B" in the view configuration) and are the first to be displayed when entering the control tab.
EXTENDED VIEW. This tab shows all the input and output variables, plus states, that have been configured as visible in the control view.
ALARMS. This tab shows the alarms currently present in the control, and a history of the alarms that have been activated at some time.
COMMANDS. This tab can be accessed only if the user has permissions on setpoints and/or commands. These are the variables configured as commands (sending a direct command to the machine) and/or the variables that have been categorized as setpoints (assigning a numerical value to a variable).
PARAMETERS. This tab can be accessed only if the user has permissions on parameters in the permissions section. These are the editable write/read variables that define the control configuration. By modifying these variables we can parameterize the operation of the control.
DOCUMENTATION. It is the section where documents about facility information, controls or other files can be stored. Here pdf, jpg or other files with information about manuals, diagrams, assistance parts, etc, can be added. This information must be attached by the client.
Create and edit a control
To create a new control, click on the + icon that appears at top right in the list of controls of a facility. If the control already exists, it can be edited by clicking on the three dots in the list of controls and selecting edit, by clicking on the name of the control with the right button and selecting edit or within the control view by clicking on the "pencil" icon that appears at top right.
All the processes described above lead to the following screen for editing and configuring a control:
General tab. This tab is for configuring the facility's name and description, in the different platform languages. In order to identify the control, an image can be assigned to the control. Finally, the control can be enabled or disabled.
miniatureimage
Protocol tab. This tab is for configuring the protocol and the relevant parameters used by the control to communicate with kiBox. If a new control is being created, the first thing we will be asked to do is to select among the different protocols allowed by the kiBox purchased for this facility.
miniatureimage
Actions tab. This tabs has the following commands:
Reload. Perform a forced to reload the information that the platform has inside the kiBox of the facility. It performs a resynchronization between platform and kiBox.
Reset. The information of the library is reloaded in this control. All the visibility's configuration of the variables, sampling times, etc, will be erased. It is used to force the loading of the current library information on the control.
Test modbus. This button opens a pop-up screen to make requests through the fieldbus on that control to the register address specified.
Edit control - actions tab
Access API tab.
Permissions tab. It is used to assign permissions to users as indicated in the section.
Permissions on controls
Ways to access to the permissions of a control: by right clicking on the control and selecting "assign permissions"; by clicking on the 3 dots to the right of the control and selecting "assign permissions" or by editing the control and selecting the "permissions" tab.
miniaturadeimage
When creating any new item, it inherits the same permissions as the facility, except for "execute commands", "change settings" or "change configuration", as these do not exist in the facility.
Permissions settings panel
Each user or group is displayed in a row. The permissions available to each control and their implication are detailed below:
View: Allows the visualization on the object or control appearing to the user in the list of controls.
Edit: Allows editing of the object or control. The "pencil" icon is available to edit the object's properties.
Delete: Allows deleting the object. The user must have the delete permission on the facility permissions.
Create: Allows creating the object or on it, the user must have the create permission on the facility permissions.
Execute commands: Allows to execute commands on the control. Only available to see if the user has the proper permission on the facility permissions.
Change settings: Allows to change settings or commands on the control. Only available to see if the user has the proper permission on the facility permissions.
Change configuration: Allows to change the configuration of the control, accessing and modifying the "Parameters" tab.
These permissions apply only to the selected control. If the same permission settings of an user in several or all the controls needs to be propagated settings, right click on the name of the user or group that you want to propagate the permissions and select the "Propagate" option. This will copy the permission settings of that user in that control to all the controls that have been previously selected.
Propagate option in the permissions configuration panel
Managing the view and control templates
View configuration
The view of a control is the definition for each control variable of its: visibility, location, description, sampling time and alarm level.
To access the view configuration it is necessary to enter the control and click on the cogwheel that appears in the last tab on the right.
miniatureimage
In the screen to edit the view you can see the following sections:
Configuration view of a control
The variables of the control are grouped by their different categories: analog inputs, analog outputs, digital inputs, etc. From the drop-down menu at the top right you can select the groups of variables to be filtered.
When editing the view of a variable, a drop-down menu appears as shown in the following image:
Detail of variable view configuration
NAME: Allows to change variable name.
DESCRIPTION: Allow to add or modify the description that will appear according to the different languages that have been configured on the platform.
ALARM LEVEL: It only appear for variables categorized as alarms. It indicates the alarm level to be assigned if such an alarm occurs in the control:
None
Low
Medium
High
Critical
INTERVAL: Allows to indicate the recording interval in seconds. If the value 0 is assigned, this variable will not be recorded in the database, so it will not be possible to save its history or to graph it. It is recommended not to use recording intervals of less than 10 seconds; 60 seconds or more is recommended.
VISIBILITY: The visibility of the variable on the platform must be indicated:
Eye crossed out. Indicates that this variable is not visible on the platform and therefore is not registered by the kiBox so is not requested through the fieldbus. The variable does not participate in the supervision.
Normal eye. The variable participates in the supervision. It does not appear in the simple view or in the extended view.
Eye B. The variable participates in the supervision and will also appear in the simple view list (basic view).
Eye 1. The variable participates in the supervision and is also visible as the main variable in the controls list. It is also the one plotted as the main variable in the simple view.
If several variables are selected at the same time on the variable list and "edit" is selected with the right button, a specific configuration can be applied to all these variables.
Once all the variables have been configured, click on the "save" button for the final configuration to take effect.
Template management
Once a given view has been configured, it can be saved for reuse in the same or another control using the same library.
To manage these templates, click on the 3 dots at the top right, next to the magnifying glass icon.
Configuration view of a control
The options that will appear are the following:
Save template: Allows saving the configuration of the current control view. Once clicked, the following pop-up window will appear, where it has to be indicated the name is wanted to be given to the new template. Selecting the name of an existing template will overwrite it. Manage templatesThe "description" field is used to add information about the template. The Active template field identifies the current template that the control is using to render its view.
Delete template: Allows the deletion of an existing template.
Load template: Allows the loading of an existing template in the current control.
There is an option in the controls list that allows to load templates at the same time in several controls. Select the controls, right click on the mouse and select "load templates".