Diferencia entre revisiones de «CONN kiBox0/en»
Página creada con «===== WAN connection. ===== Using an ethernet cable (RJ45). One end is connected to the WAN port of our kiBox and the other end to the router or modem of the client/facility.» |
Sin resumen de edición |
||
| (No se muestran 2 ediciones intermedias del mismo usuario) | |||
| Línea 1: | Línea 1: | ||
== kiBox0 Connection == | == kiBox0 Connection == | ||
kiBox0 has a network cable, a SIM plug and three antennas. | kiBox0 has a network cable, a SIM plug and three antennas. | ||
==== 1. Front side ==== | ==== 1. Front side ==== | ||
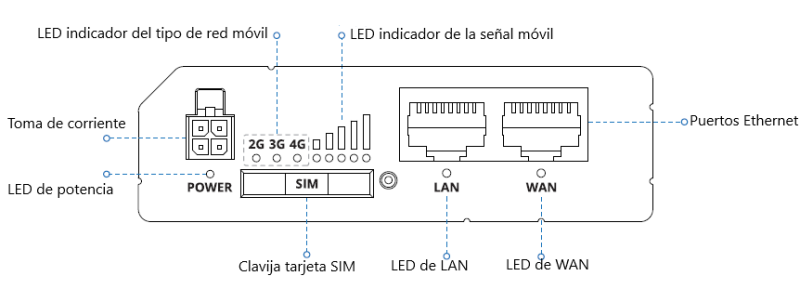
On the front side we find: | On the front side we find: | ||
[[Archivo:001 - conn kibox0.png|centro|miniaturadeimagen|800x800px|kibox0 front side.]] | [[Archivo:001 - conn kibox0.png|centro|miniaturadeimagen|800x800px|kibox0 front side.]] | ||
| Línea 15: | Línea 17: | ||
The internet connection parameters of kiBox0 are configured at the factory, ready to connect and operate. | The internet connection parameters of kiBox0 are configured at the factory, ready to connect and operate. | ||
===== WAN connection. ===== | ===== WAN connection. ===== | ||
Using an ethernet cable (RJ45). One end is connected to the WAN port of our kiBox and the other end to the router or modem of the client/facility. | Using an ethernet cable (RJ45). One end is connected to the WAN port of our kiBox and the other end to the router or modem of the client/facility. | ||
===== Wireless connection. ===== | ===== Wireless connection. ===== | ||
To connect kiBox0 as a WiFi client, it is necessary to manually configure the network to which you want to connect. | To connect kiBox0 as a WiFi client, it is necessary to manually configure the network to which you want to connect. | ||
To do this, we must connect kiBox0 to the PC via RJ45 cable (it may be necessary to use an RJ45 to USB adapter, not included). Access the kiBox by entering the IP in the navigation bar of a web browser. | <div class="mw-translate-fuzzy"> | ||
To do this, we must connect kiBox0 to the PC via RJ45 cable (it may be necessary to use an RJ45 to USB adapter, not included). Access the kiBox by entering the IP in the navigation bar of a web browser. | |||
</div> | |||
Type credentials, indicated on kibox0 downside. | Type credentials, indicated on kibox0 downside. | ||
Once inside the interface, navigate to SSIDS tab. Click on the "Scan" button and it will scan all available WiFi connections. Select the desired connection, enter the password and click on the "Save&Apply" button. | |||
NOTE: connect the antennas for correct operation. | |||
===== GPRS connection. ===== | |||
For kiBox to connect to Internet via GPRS, it is necessary to insert the SIM card into the plug. To do this, using the small SIM KIT punch tool included with the purchase of your kiBox0, you must remove the tray and insert your SIM card as it fits without forcing it into the tray. Insert the tray back into the device. | |||
After a few minutes, it will connect automatically. If you notice that it does not work, try restarting the device by removing power for 10 seconds and reconnecting it to the mains. Note that it may take up to 5 minutes for GPRS connectivity to be established. | |||
NOTE: connect the antennas for correct operation. | |||
==== 2. Rear side ==== | |||
On the rear side we find: | |||
[[File:002 - conn kibox0.png|center|miniaturadeimagen|720x720px|Rear side kiBox0]] | |||
The antennas must be connected for optimal operation and performance of the device. | |||
===== Reset button. ===== | |||
==== | |||
The reset button can have two functions: | |||
* '''Reset the device.''' If reset button is pressed for <u>4 seconds</u>, the device will restart. This function will be visible thanks to the mobile signal strength LED indicator, which will flash with the 5 bars at the same time. | |||
* ''' | * '''Reset to factory settings'''. If the reset button is pressed for at least <u>5 seconds</u>, the device will initiate a factory reset. The device may lose connectivity if you update the configuration without the help of the kiconex support department and may even result in data loss. | ||
* ''' | |||
Revisión actual - 13:32 27 ago 2024
kiBox0 Connection
kiBox0 has a network cable, a SIM plug and three antennas.
1. Front side
On the front side we find:

kibox0 can access to internet via:
- WAN, ethernet wire.
- Wireless
- GPRS
The internet connection parameters of kiBox0 are configured at the factory, ready to connect and operate.
WAN connection.
Using an ethernet cable (RJ45). One end is connected to the WAN port of our kiBox and the other end to the router or modem of the client/facility.
Wireless connection.
To connect kiBox0 as a WiFi client, it is necessary to manually configure the network to which you want to connect.
To do this, we must connect kiBox0 to the PC via RJ45 cable (it may be necessary to use an RJ45 to USB adapter, not included). Access the kiBox by entering the IP in the navigation bar of a web browser.
Type credentials, indicated on kibox0 downside.
Once inside the interface, navigate to SSIDS tab. Click on the "Scan" button and it will scan all available WiFi connections. Select the desired connection, enter the password and click on the "Save&Apply" button.
NOTE: connect the antennas for correct operation.
GPRS connection.
For kiBox to connect to Internet via GPRS, it is necessary to insert the SIM card into the plug. To do this, using the small SIM KIT punch tool included with the purchase of your kiBox0, you must remove the tray and insert your SIM card as it fits without forcing it into the tray. Insert the tray back into the device.
After a few minutes, it will connect automatically. If you notice that it does not work, try restarting the device by removing power for 10 seconds and reconnecting it to the mains. Note that it may take up to 5 minutes for GPRS connectivity to be established.
NOTE: connect the antennas for correct operation.
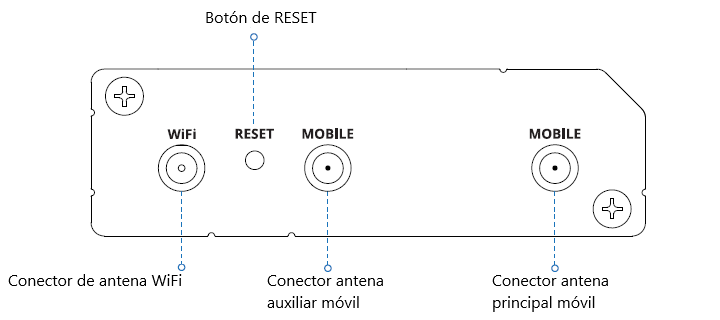
2. Rear side
On the rear side we find:

The antennas must be connected for optimal operation and performance of the device.
Reset button.
The reset button can have two functions:
- Reset the device. If reset button is pressed for 4 seconds, the device will restart. This function will be visible thanks to the mobile signal strength LED indicator, which will flash with the 5 bars at the same time.
- Reset to factory settings. If the reset button is pressed for at least 5 seconds, the device will initiate a factory reset. The device may lose connectivity if you update the configuration without the help of the kiconex support department and may even result in data loss.
