You can add a 3G router as an accessory in your ''kiconex'' order to solve your Internet access problems and which offers the following connectivity options:
You can add a 3G router as an accessory in your ''kiconex'' order to solve your Internet access problems and which offers the following connectivity options:
Línea 11:
Línea 12:
__TOC__
__TOC__
== Router access ==
== Router access ==
To access the router configuration portal, you can connect your computer to the LAN port and type the IP [http://192.168.0.1:8080 '''192.168.0.1:8080'''] in your web browser.
To access the router configuration portal, you can connect your computer to the LAN port and type the IP [http://192.168.0.1:8080 '''192.168.0.1:8080'''] in your web browser.
== Router web portal == When accessing, the router displays the page with a general operating status: [[File:2-status-overview.png|center|miniaturadeimage|800x800px|Router status page]]
== Router web portal == When accessing, the router displays the page with a general operating status: [[File:2-status-overview.png|center|miniaturadeimage|800x800px|Router status page]]
Línea 23:
Línea 24:
In the following sections, you can see how to make a network configuration on the router.
In the following sections, you can see how to make a network configuration on the router.
== Network configuration ==
== Network configuration ==
=== Factory defaults ===
=== Factory defaults ===
When you receive a router prepared for use in a kiconex network, the default configuration is:
When you receive a router prepared for use in a kiconex network, the default configuration is:
Línea 37:
Línea 38:
** Password: '''''00#Kiconex'''''
** Password: '''''00#Kiconex'''''
=== Connecting the router as a client of a WiFi network ===
=== Connecting the router as a client of a WiFi network ===
The router allows you to connect as a client of a WiFi network to obtain Internet. The procedure is as follows:
The router allows you to connect as a client of a WiFi network to obtain Internet. The procedure is as follows:
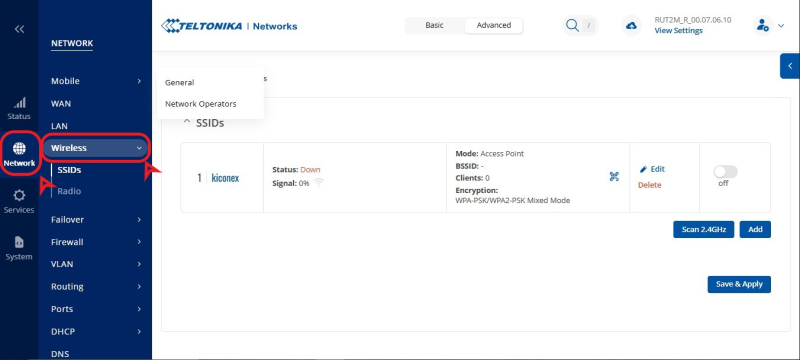
*Click on '''NETWORK>WIRELESS''': [[File:Network-wireless menu.png|center|miniaturadeimage|800x800px|WiFi network menu]]
*Click on '''NETWORK>WIRELESS''': [[File:Network-wireless menu.png|center|miniaturadeimage|800x800px|WiFi network menu]]
Línea 48:
Línea 49:
* You will be able to see the new network running from the '''NETWORK>INTERFACES:''' menu [[File:New wifi net.png|center|miniaturadeimage|800x800px|Router connected as a client to a WiFi network]]
* You will be able to see the new network running from the '''NETWORK>INTERFACES:''' menu [[File:New wifi net.png|center|miniaturadeimage|800x800px|Router connected as a client to a WiFi network]]
=== Crear una red WiFi ===
=== Crear una red WiFi ===
Puede crear una red WiFi siguiendo los siguientes pasos:
Puede crear una red WiFi siguiendo los siguientes pasos:
<div lang="es" dir="ltr" class="mw-content-ltr">
* Click on '''NETWORK>WIRELESS'''': [[File:Network-wireless menu.png|center|miniatureimage|800x800px|WiFi network menu]]
* Clic en '''NETWORK>WIRELESS''':
* Click to '''enable''' the existing WiFi network and click on the '''configuration''' '''symbol''': [[File:Enable wireless.png|center|miniaturadeimage|800x800px|Enable WiFi network]]
[[Archivo:Network-wireless menu.png|centro|miniaturadeimagen|800x800px|Menú red WiFi]]
* Configure the desired SSID in the '''''GENERAL SETUP''''' section:
* Clic para '''habilitar''' la red WiFi existente y clic en el '''simbolo''' '''de configuración''':
[[Archivo:Enable wireless.png|centro|miniaturadeimagen|800x800px|Habilitar red WiFi]]
* Configure el SSID deseado en la sección '''"GENERAL SETUP"''':
To change the APN associated to your mobile provider's SIM, you can do so by configuring the '''interface''' corresponding to the 3G network, '''MOB1S1A1A1''':
[[Archivo:Mobile edit.png|centro|miniaturadeimagen|800x800px|Access button to edit mobile network interface]]
The router's WAN port can be configured as a second LAN port. To do this, we must take into account the firmware version of our kibox. If it has version 07.05.4 or higher, we will carry out a process. If it has a version older than this, we will have to go through a different process.
<span id="Versión_07.05.4_o_superior"></span>
<div class="mw-translate-fuzzy">
==== Version 07.05.4 or higher ====
</div>
</div>
<div lang="es" dir="ltr" class="mw-content-ltr">
* We make sure that we are in the basic mode of the interface by looking at the top of it:
* Establezca el cifrado y la contraseña deseados en la sección '''"WIRELESS SECURITY"''':
</div>
[[Archivo:Captura de pantalla 2024-07-10 081847.png|centro|miniaturadeimagen|800x800px]]
<div lang="es" dir="ltr" class="mw-content-ltr">
* Navigate to the '''Network''' '''> LAN''' section and '''edit the LAN record''':
[[Archivo:Captura de pantalla 2.png|centro|miniaturadeimagen|800x800px]]
* Haga clic en '''"SAVE & APPLY"''' para guardar la configuración.
</div>
<div lang="es" dir="ltr" class="mw-content-ltr">
* In the registry editing window navigate to the '''Interfaces: lan''' section and find the '''`Use WAN port as LAN`''' option, change its value to '''`ON`''':
* Haga clic en '''"SAVE & APPLY"''' para confirmar la configuración inalámbrica:
</div>
<div lang="es" dir="ltr" class="mw-content-ltr">
[[Archivo:Captura de pantalla3.png|centro|miniaturadeimagen|800x800px]]
* Click '''"SAVE and APPLY"''' to save the settings:
<div lang="es" dir="ltr" class="mw-content-ltr">
[[Archivo:Captura de pantalla 3.png|centro|miniaturadeimagen|800x800px]]
=== Cambiar la configuración de APN móvil ===
Para cambiar la APN asociada a la SIM de su proveedor móvil, se puede hacer configurando la '''interfaz''' correspondiente a la red 3G, '''MOB1S1A1''':
[[Archivo:Mobile edit.png|centro|miniaturadeimagen|800x800px|Botón de acceso a la edición de la interfaz de red móbil]]
[[Archivo:APN CONFIG.png|centro|miniaturadeimagen|800x800px|Configuración de dirección APN]]
</div>
<div lang="es" dir="ltr" class="mw-content-ltr">
<div class="mw-translate-fuzzy">
=== Cofigurar puerto WAN como LAN ===
==== Version prior to 07.05.4 ====
El puerto WAN del router puede ser configurado como un segundo puerto LAN, el proceso es el siguiente:
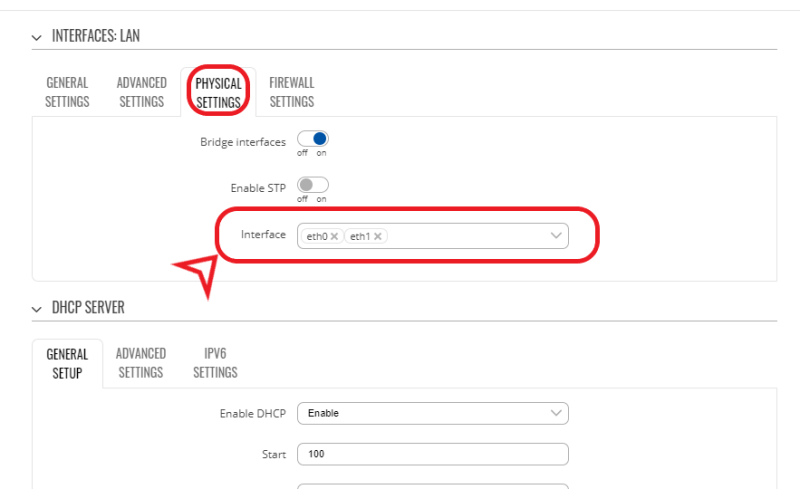
*Añadir "'''eth1'''" en el campo "'''Interface'''", dentro de la pestaña '''physical settings''':
*Add "'''eth1'''" in the "'''Interface'''" field, within the '''physical' tab settings''': [[Archivo:PHYSICAL SETTINGS LAN.png|centro|miniaturadeimagen|800x800px]]
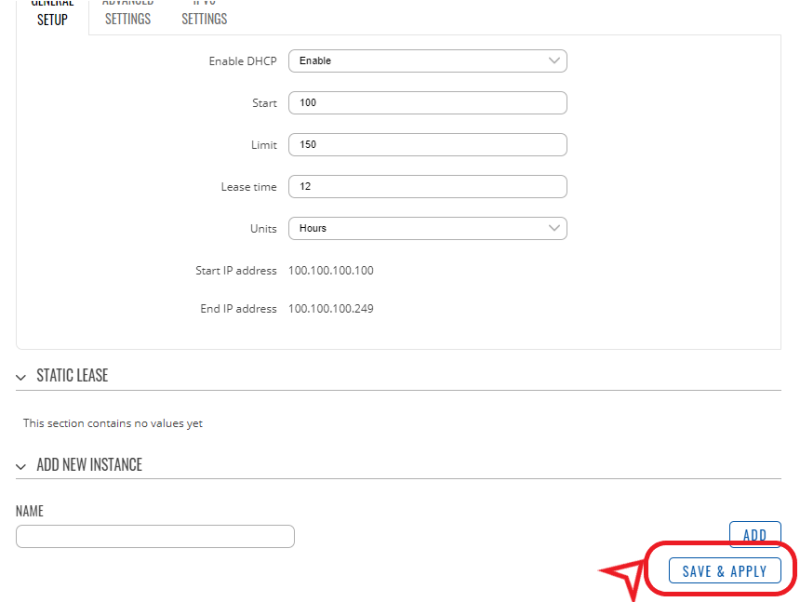
*Apply changes with "'''Save & apply'''": [[Archivo:SAVE LAN CONFIG.png|centro|miniaturadeimagen|800x800px]]
*Aplicar cambios con "'''Save & apply'''":
[[Archivo:SAVE LAN CONFIG.png|centro|miniaturadeimagen|800x800px]]
</div>
</div>
Revisión actual - 14:28 27 ago 2024
Optional Router
You can add a 3G router as an accessory in your kiconex order to solve your Internet access problems and which offers the following connectivity options:
To access the router configuration portal, you can connect your computer to the LAN port and type the IP 192.168.0.1:8080 in your web browser.
== Router web portal == When accessing, the router displays the page with a general operating status:
Router status page
In the menu on the left, you have 3 options:
STATUS: displays a menu with the status of the different router tools
NETWORK: the options in this menu allow you to change the router's network configuration
SYSTEM: from here you can change the user password or reboot the router.
In the following sections, you can see how to make a network configuration on the router.
Network configuration
Factory defaults
When you receive a router prepared for use in a kiconex network, the default configuration is:
Priority use of SIM to connect to internet
Use of WAN port to get internet, in case no SIM is used or no coverage
WiFi network with open with the following configuration:
SSID: kiconex
Password: KiconexWiFi
LAN network to connect clients via ethernet cable, in the IP range 192.168.0.0
User access to the web portal:
User: kiconex
Password: 00#Kiconex
Connecting the router as a client of a WiFi network
The router allows you to connect as a client of a WiFi network to obtain Internet. The procedure is as follows:
Click on NETWORK>WIRELESS: WiFi network menu
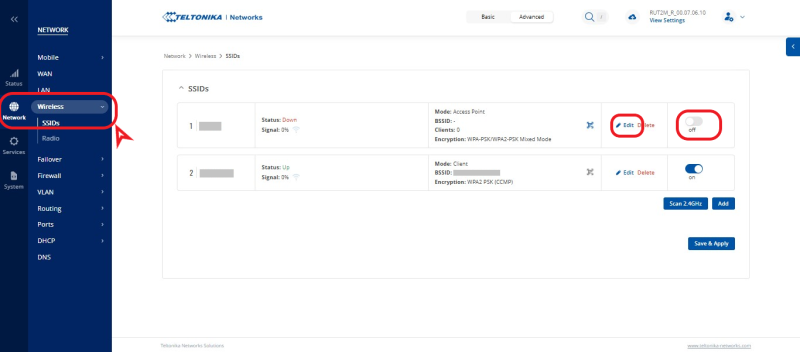
Click to 'disable' the existing WiFi network and click on the SCAN option:
Disable WiFi network AP to scan for other nearby WiFi networks
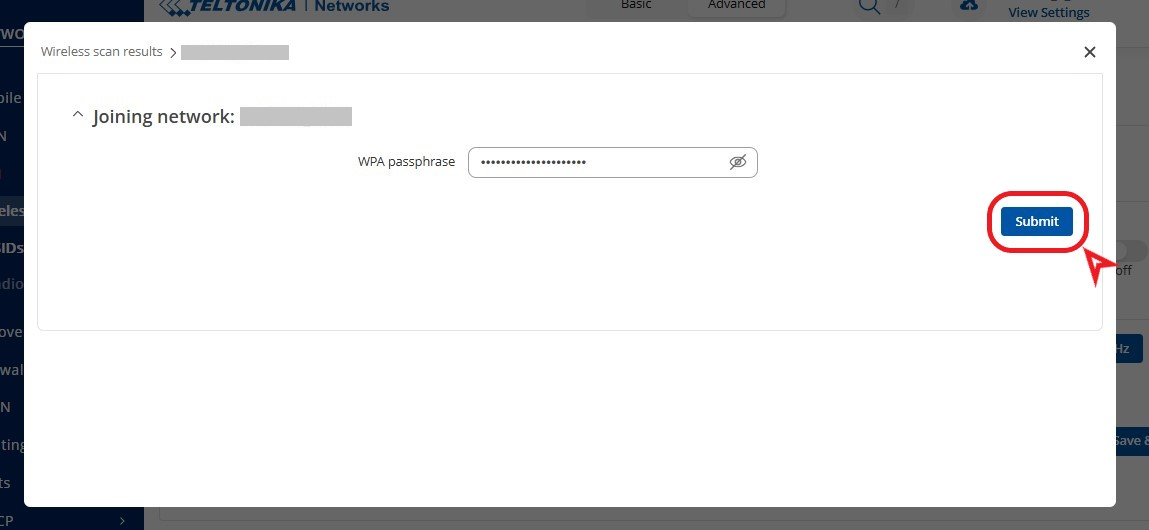
Click "JOIN NETWORK" on WiFi network you want to connect to:
Scan result for WiFi networks. Select the desired one from Join Network
Enter the password for the WiFi network and set a name for the network interface to be created: Password and name for WiFi network to which you connect as a client * Confirm the settings by clicking "SAVE & APPLY":
Confirm WiFi settings set
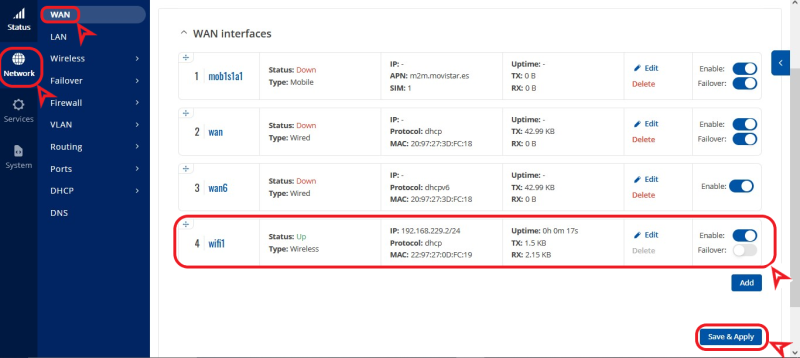
You will be able to see the new network running from the NETWORK>INTERFACES: menu Router connected as a client to a WiFi network
Crear una red WiFi
Puede crear una red WiFi siguiendo los siguientes pasos:
Click on NETWORK>WIRELESS': WiFi network menu
Click to enable the existing WiFi network and click on the configurationsymbol: Enable WiFi network
Configure the desired SSID in the GENERAL SETUP section:
WiFi SSID
Set the desired encryption and password in the "WIRELESS SECURITY" section:
WiFi password
Click SAVE & APPLY to save the configuration.
Click SAVE & APPLY to confirm the wireless configuration:
Confirm wireless configuration
Changing the mobile APN configuration
To change the APN associated to your mobile provider's SIM, you can do so by configuring the interface corresponding to the 3G network, MOB1S1A1A1:
Access button to edit mobile network interfaceAPN address configuration
Configure WAN port as LAN
The router's WAN port can be configured as a second LAN port. To do this, we must take into account the firmware version of our kibox. If it has version 07.05.4 or higher, we will carry out a process. If it has a version older than this, we will have to go through a different process.
Version 07.05.4 or higher
We make sure that we are in the basic mode of the interface by looking at the top of it:
Navigate to the Network> LAN section and edit the LAN record:
In the registry editing window navigate to the Interfaces: lan section and find the `Use WAN port as LAN` option, change its value to `ON`:
Click "SAVE and APPLY" to save the settings:
Version prior to 07.05.4
Click on NETWORK>INTERFACES:
Disable the WAN and WAN6 options:
Apply change with "Save & apply":
Click on edit LAN:
Add "eth1" in the "Interface" field, within the physical' tab settings:
 You can add a 3G router as an accessory in your kiconex order to solve your Internet access problems and which offers the following connectivity options: