Diferencia entre revisiones de «Reports/en»
Página creada con «=== Report creation === By accessing the [https://{{SERVERNAME}}/index.php/Special:myLanguage/Facilities facility], it access the reports: {| class="wikitable sortable" |centro|miniatureimage|450x450px |centro|miniatureimage|450x450px |} From this section, there are two tabs: one to list each type of report. Turther to the right is the "+" ico…» |
|||
| Línea 24: | Línea 24: | ||
Clicking on the creation icon takes you to a window with three configuration tabs: | |||
* '''GENERAL''': name and description for the report. | |||
* '''GENERAL''': | * '''Report configuration''': an interval between each variable data is established. Besides being able to add these variables from the "+" icon, to the right of ''Current series''. | ||
* ''' | * '''PERMISSIONS''': tab allowed to give permissions to another user to view the created report. By default, the report can only be viewed by the user who created it. | ||
* ''' | |||
[[Archivo:SP Pestaña general informe.png|centro|miniatureimage|800x800px|'''General tab''' of report configuration, allows to set '''name''' and '''description'''.]] | |||
[[Archivo:SP Pestaña general informe.png|centro| | [[Archivo:SP Pestaña configuración informe.png|centro|miniatureimage|800x800px|'''Report configuration tab''', where '''interval''' between each data is set and '''desired variables''' are added.]] | ||
[[Archivo:SP Pestaña configuración informe.png|centro| | |||
To add variables to the report, click on the "+" icon, which opens the following window: | |||
[[Archivo:SP adición variables a informe.png|centro|miniaturadeimagen|600x600px|Window for adding '''variables''', specifying the '''control''' and the '''facility''' in which they are located.]] | |||
[[Archivo:SP adición variables a informe.png|centro|miniaturadeimagen|600x600px| | |||
In this window, one or several variables of interest can be selected. | |||
=== Editing the report === | |||
== | The report can be edited from two places: by right mouse clicking on it and selecting the '''edit''' option. As shown in these images: | ||
[[Archivo:Editar informe en instalacion.png|centro|miniatureimage|800x800px|Editing a report, from the corresponding section within the installation.]] | |||
[[Archivo:Editar informe en instalacion.png|centro| | [[Archivo:Editar informe desde lista del menú lateral.png|centro|miniaturadeimagen|800x800px|Editing a report from the list obtained in the side report menu.]] | ||
[[Archivo:Editar informe desde lista del menú lateral.png|centro|miniaturadeimagen|800x800px| | |||
=== Downloading the report === | |||
Before downloading the report, it is necessary to confirm the start and end date of the data to be downloaded, as well as the time interval between each data point. The following image shows each of the points of the report: | |||
<div lang="es" dir="ltr" class="mw-content-ltr"> | <div lang="es" dir="ltr" class="mw-content-ltr"> | ||
Revisión del 16:37 14 sep 2023
Reports
Reports are one of mykiConex tool that allows to export data from connected devices. Currently, there are two types of reports:
- Data export: enabled exclusively in facilities with PROFESSIONAL or PREMIUM plan. Allows to export in Excel file the historical data of the desired variables, being able to select a start and end date of the data to be downloaded, as well as a time interval between data and downloaded data.
- Statistical report: enabled exclusively in facilities with PREMIUM plan. It performs a very simple statistical analysis of the selected variables:
- For analog variables: maximum, minimum and average.
- For digital variables: percentage of active and inactive times, number of active times.
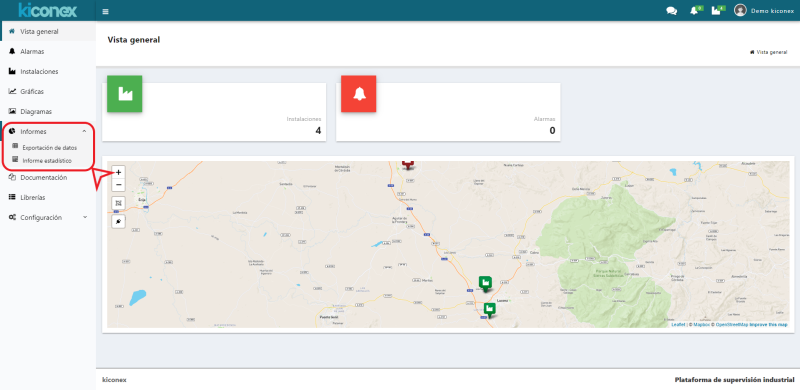
Reports can be created from the corresponding section within instalación.
From the left side menu, all the reports created in any of the facilities are shown.
Report creation
By accessing the facility, it access the reports:
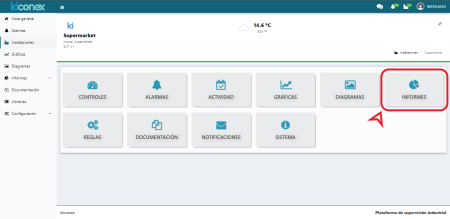 |
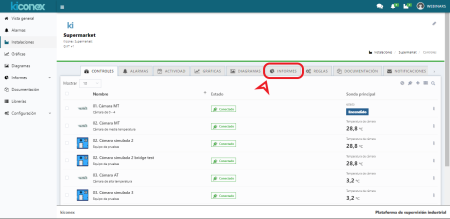 |
From this section, there are two tabs: one to list each type of report. Turther to the right is the "+" icon to create a new report.
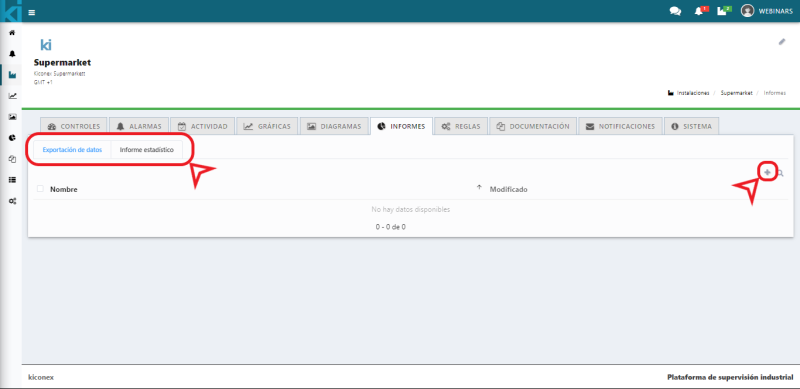
Clicking on the creation icon takes you to a window with three configuration tabs:
- GENERAL: name and description for the report.
- Report configuration: an interval between each variable data is established. Besides being able to add these variables from the "+" icon, to the right of Current series.
- PERMISSIONS: tab allowed to give permissions to another user to view the created report. By default, the report can only be viewed by the user who created it.


To add variables to the report, click on the "+" icon, which opens the following window:
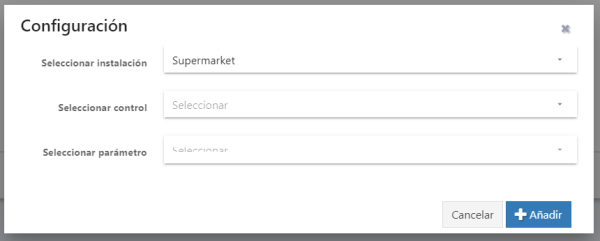
In this window, one or several variables of interest can be selected.
Editing the report
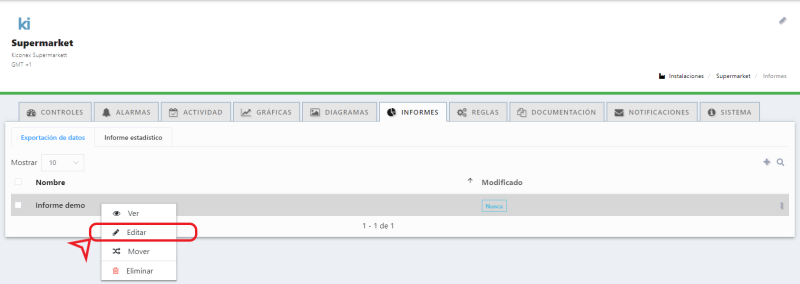
The report can be edited from two places: by right mouse clicking on it and selecting the edit option. As shown in these images:

Downloading the report
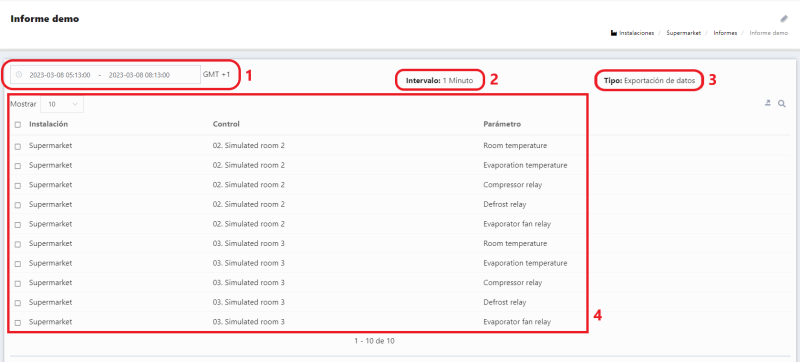
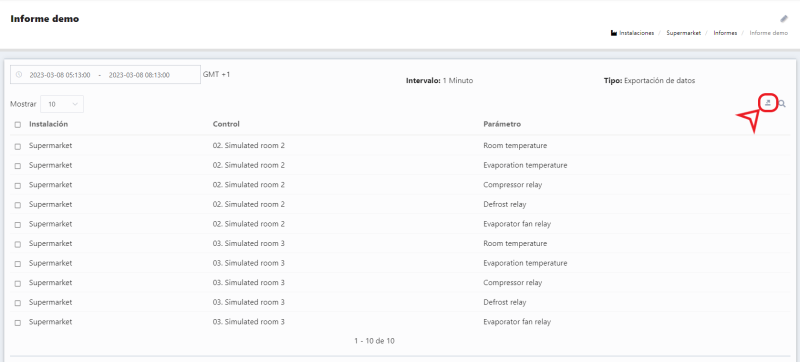
Before downloading the report, it is necessary to confirm the start and end date of the data to be downloaded, as well as the time interval between each data point. The following image shows each of the points of the report:
- Fecha de comienzo y de fin de los datos a tratar. En la imagen de ejemplo siguiente se ha seleccionado una semana de datos. Se muestra la derecha la zona horaria con la que se descargarán los datos, para más información puede consultar la configuración de la instalación o del perfil de usuario.
- Intervalo: Tiempo entre cada dato. Tiene un valor mínimo que depende de la configuración de las variables del control. Por defecto, es habitual el uso de un intervalo de 60 seg. en la mayoría de controles conectados.
- Tipo: indica el tipo de informe que se descargará.
- Lista las variables implicadas en el informe, mostrando información de la instalación y el control al que pertenecen.
Para la descarga del informe, solo hay que hacer clic en el símbolo con la flecha que hay junto a la lupa, como se muestra en la imagen a continuación:
Interpretación de un informe de exportación de datos
El resultado de descargar un informe de exportación de datos, es un excel con el aspecto de la siguiente imagen:

La información mostrada es la siguiente:
- Logo de la organización en la cabecera
- 5 líneas para cada variable, donde se indica:
- Instalación de procedencia de la variable
- Control al que pertenece dicha variable
- Nombre
- Unidad de medida
- Tipo: Cómo la plataforma interpreta esa variable: analógica o digital
- Una línea para cada dato registrado de cada variable. En la primera columna se muestra la fecha y hora de registro del dato y en la columna de cada variable el valor correspondiente.
Interpretación de un informe estadístico
El resultado de descargar un informe estadístico, es un excel con el aspecto de la siguiente imagen:
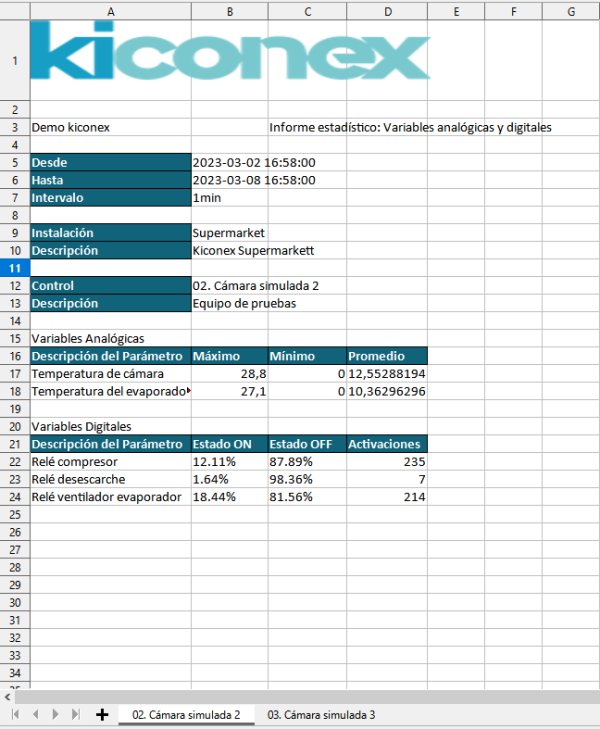
La información mostrada es la siguiente:
- Logo de la organización en la cabecera
- Usuario qua ha descargado el informe
- Datos de tiempo:
- Fecha de comienzo de los datos analizados
- Fecha de fin de los datos
- Intervalo o tiempo entre cada dato implicado en el análisis.
- Nombre y descripción de la instalación a la que pertenecen las variables.
- Nombre y descripción del control que contiene dichas variables.
- Análisis de variables analógicas, con los datos: máximo, mínimo y media
- Análisis de variables digitales: indica % de endendidos y % de apagados, así como un contaje de la cantidad de activaciones que sufre la variable.
Como se puede ver, se crea una hoja de datos para cada control implicado, así se pueden hacer comparativas de funcionamiento para controles de un mismo modelo.

