To access to the user's profile, click on the username located at the top right of the screen:
Para acceder al perfil, pulsar sobre el nombre de usuario situado en la parte superior derecha de la pantalla:
[[Archivo:Acceso perfil usuario.png|centro|miniaturadeimagen|800x800px|How to access to user's profile]]
[[Archivo:Acceso perfil usuario.png|centro|miniaturadeimagen|800x800px|How to access to user's profile]]
Clicking on that, a pop-up windows will bring up. In this windows we will have the option to exit and close session, and the button to access to our “profile”:
Al hacerlo, se desplegará una pequeña ventana. En ella, tendremos la opción de salir y cerrar sesión, y el botón para acceder a nuestro “perfil”:
[[Archivo:Pop-up acceso perfil.png|centro|miniaturadeimagen|Pop-up to access user's profile]]
[[Archivo:Pop-up acceso perfil.png|centro|miniaturadeimagen|Pop-up to access user's profile]]
When you click on the “profile” button, you will access to the profile section. Here, you have the following subsections:
Cuando se pulsa sobre el botón “perfil”, se accederá al perfil. Aquí, se tiene lo siguiente:
<!--T:3-->
<!--T:3-->
* Information about the user (name, email and groups to which it belongs)
* Información sobre el usuario (nombre, email y grupos a los que pertenece)
* In the “activity” tab you can see the record of all the actions carried out by the user on the platform.
* En la pestaña “actividad” se puede ver el registro de todas las acciones realizadas por el usuario en la plataforma.
* In the “facilities” tab you can find all the facilities to which that user has access permissions.
* En la pestaña “instalaciones” se pueden encontrar todas las instalaciones a las que tiene permisos de acceso ese usuario.
[[Archivo:How to edit user's profile.png|centro|miniaturadeimagen|800x800px|How to edit user's profile]]
[[Archivo:How to edit user's profile.png|centro|miniaturadeimagen|800x800px|How to edit user's profile]]
In order to edit the user's profile, it is necessary to click on the edit button (pencil icon) at the top right.
Para poder editar el perfil del usuario es necesario pulsar sobre el botón de editar (icono lápiz) arriba a la derecha.
<!--T:4-->
<!--T:4-->
In this section we can make the following settings on the user profile:
En esta sección podemos realizar las siguientes configuraciones sobre el perfil del usuario:
<!--T:5-->
<!--T:5-->
* '''PROFILE''': Basic user data such as names, email and telephone.
* '''PERFIL''': Datos básicos del usuario como son nombres, email y teléfono.
* '''SECURITY''': Configuration of the user password
* '''SEGURIDAD''': Configuración de la contraseña de usuario.
* '''PREFERENCES''': Settings for personalized viewing of the platform.
* '''PREFERENCIAS''': Ajustes para visualización personalizada de la plataforma.
* '''LOCATION''': User location
* '''UBICACION''': Ubicación del usuario.
* '''FACILITIES''': Facilities where the user has access permissions.
* '''INSTALACIONES''': Instalaciones donde el usuario tiene permisos de acceso.
<!--T:6-->
<!--T:6-->
[[Archivo:Elementos en edicion perfil.png|centro|miniaturadeimagen|800x800px|Elements when edit user's profile]]
[[Archivo:Elementos en edicion perfil.png|centro|miniaturadeimagen|800x800px|Elements when edit user's profile]]
=== Profile === <!--T:7-->
=== Perfil === <!--T:7-->
In this section the following user profile fields can be configured:
En esta sección se pueden configurar los siguientes campos del perfil de usuario:
<!--T:8-->
<!--T:8-->
* '''USER''': is the username used to login into the platform. This name is required to be filled in and must be unique. There cannot be two users with the same username.
* '''USUARIO''': es el nombre de usuario que se utiliza para el login en la plataforma. Este nombre es obligatorio que se rellene y ha de ser único. No pueden existir dos usuarios con el mismo nombre de usuario.
* '''FULL NAME''': This field is filled in with the user's full name and its purpose is merely informative in order to more easily identify each user within the platform.
* '''NOMBRE COMPLETO''': Este campo se rellena con el nombre completo del usuario y su finalidad es meramente informativa para poder identificar más fácilmente cada usuario dentro de la plataforma.
* '''E-MAIL''': The email is also a required field and its function is to be able to recover the user's password, as well as to be able to receive alarm notifications from the platform.
* '''CORREO ELECTRÓNICO''': El correo electrónico es también un campo obligatorio y su función es poder recuperar la contraseña del usuario, así como poder recibir notificaciones de alarmas de la instalación.
* '''TELEPHONE''': To enter the user's telephone number, it is first necessary to identify the user's country by displaying the menu with the flag and selecting the country. This will automatically fill in the prefix of that country. The rest of the phone number will be filled in manually. The purpose of this field is to be able to receive SMS notifications of platform alarms.
* '''TELÉFONO''': Para ingresar el número de teléfono del usuario, primero es necesario identificar el país del usuario desplegando en menú con la bandera y seleccionando dicho país. De esta forma se rellenará automáticamente el prefijo de dicho país. El resto del número de teléfono se rellanará manualmente. El objetivo de este campo es poder recibir notificaciones SMS de alarmas de la plataforma.
* '''ENABLED''': The “enabled” button is used to enable and disable a user on the platform. Any user that is disabled will have access denied in the login section of the platform.
* '''HABILITAR''': El botón “habilitado” sirve para habilitar y deshabilitar un usuario en la plataforma. Cualquier usuario que este deshabilitado tendrá el acceso denegado en la sección de login de la plataforma.
* '''IMAGE''': The user can upload an image to personalize his user. To do so, it is first necessary to delete the current profile picture (red) and upload a new one (orange).
* '''IMAGEN''': El usuario puede subir una imagen para personalizar su usuario para ello es necesario, primero, eliminar la foto de perfil actual (rojo) y subir una nueva (naranja).
[[Archivo:Change the image of the user's profile.png|alt=Change the image of the user's profile|centro|miniaturadeimagen|800x800px|Change the image of the user's profile]]
[[Archivo:Change the image of the user's profile.png|alt=Change the image of the user's profile|centro|miniaturadeimagen|800x800px|Change the image of the user's profile]]
<!--T:9-->
<!--T:9-->
To upload an image, simply drag and drop an image into the box, or click in the file browser to browse for an image.
Para subir una imagen, basta con arrastrarla al cuadro, o pulsar en el explorador de archivos para buscar una imagen.
=== Security. User's password === <!--T:10-->
=== Seguridad. Cambio de contraseña === <!--T:10-->
In this section you can modify the current password. To do this, it is first necessary to enter the user's current password, then the new password must be entered, and again, repeat the password to verify that there has not been an error when writing it.
En esta sección se puede modificar la contraseña actual. Para ello primero es necesario introducir la contraseña actual del usuario, acto seguido se debe introducir la nueva contraseña, y de nuevo, repetir la contraseña para comprobar que no ha habido un error al escribirla.
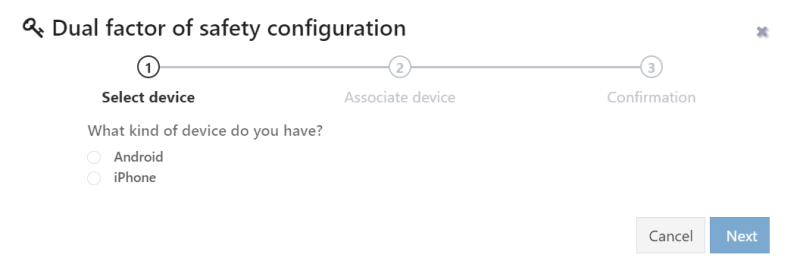
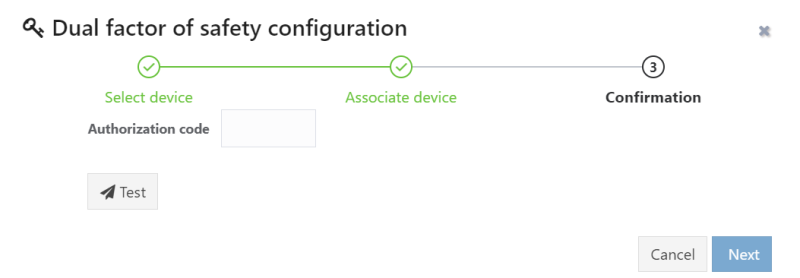
There is the possibility of creating a double safety factor, in order to verify the login from a mobile device. You can enable this featuring just clicking on ''google authenticator'' switch and can be easily configured by following these three steps:
Existe la posibilidad de crear un doble factor de seguridad. Con el objetivo de verificar el inicio de sesión desde un dispositivo móvil. Al habilitarlo se abre la ventana de la imagen y se puede configurar fácilmente siguiendo el proceso que se muestra:
<!--T:12-->
<!--T:12-->
# In the first step you need to select which is the device to use in order to configure the double safety factor[[Archivo:Doble factor autentificación 1.png|alt=Double safety factor. Selecting device.|centro|miniaturadeimagen|800x800px|Double safety factor. Selecting device.]]
# En el primer paso es necesario seleccionar el tipo de dispositivo donde se va a instalar y configurar el doble factor de seguridad.[[Archivo:Doble factor autentificación 1.png|alt=Double safety factor. Selecting device.|centro|miniaturadeimagen|800x800px|Double safety factor. Selecting device.]]
# Once you have selected a device, the platform show you a QR to download the app to create the double password[[Archivo:Doble factor autentificación 2.png|alt=Double safety factor. Download app.|centro|miniaturadeimagen|800x800px|Double safety factor. Download app.]]
# Una vez se ha seleccionado el dispositivo, la plataforma mostrará un código QR para descargar la aplicación para crear el doble password de acceso.[[Archivo:Doble factor autentificación 2.png|alt=Double safety factor. Download app.|centro|miniaturadeimagen|800x800px|Double safety factor. Download app.]]
# Finally, after installing the app in your device you can confirm the configuration using an ''authorization code'' generated by the app[[Archivo:Doble factor autentificación 3.png|alt=Double safety factor. Activating and verifying the app.|centro|miniaturadeimagen|800x800px|Double safety factor. Activating and verifying the app.]]
# Finalmente, después de instalar la app en el dispositivo, se debe confirmar la configuración introduciendo el código de seguridad generado por la app instalada.[[Archivo:Doble factor autentificación 3.png|alt=Double safety factor. Activating and verifying the app.|centro|miniaturadeimagen|800x800px|Double safety factor. Activating and verifying the app.]]
=== Preferences === <!--T:13-->
=== Preferencias === <!--T:13-->
In this section you can configure different aspects of the user and the interface of the platform.
En esta sección se puede configurar diferentes aspectos del usuario y de la interfaz en la plataforma.
==== User session. Stay connected ==== <!--T:14-->
==== Sesión de usuario. Permanecer siempre conectado ==== <!--T:14-->
The first configuration switch allows you to choose if you want to keep your session always open when accessed from the same browser.
El primer lugar se permite elegir si se desea que la sesión esté siempre abierta cuando se accede desde un mismo navegador.
<!--T:15-->
<!--T:15-->
In case of disabling this option, the inactivity time is requested, after which the session will be closed automatically. We strongly recommend to use configure an ''inactivity time'' in order to improve the security of the platform.
En caso de deshabilitar esta opción, se solicita el tiempo de inactividad, tras el cual se cerrará la sesión automáticamente. Por seguridad, lo recomendable es no habilitar la pestaña “Permanecer conectado”.
[[Archivo:Configuración tiempo de inactividad.png|alt=Configuration for the inactivity time|centro|miniaturadeimagen|800x800px|Configuration for the inactivity time]]
[[Archivo:Configuración tiempo de inactividad.png|alt=Configuration for the inactivity time|centro|miniaturadeimagen|800x800px|Configuration for the inactivity time]]
Revisión del 15:34 25 nov 2022
Otros idiomas:
Español
En esta sección encontraras como puedes personalizar la interfaz de kiconex sólo para un cierto usuario para poder adaptarla a su idioma, región , formato numérico...etc. En esta sección también se indica como ajustar la seguridad del usuario.
Una vez se ha accedido a la plataforma, se tendrá una vista similar a la siguiente:
Main page
Para acceder al perfil, pulsar sobre el nombre de usuario situado en la parte superior derecha de la pantalla:
How to access to user's profile
Al hacerlo, se desplegará una pequeña ventana. En ella, tendremos la opción de salir y cerrar sesión, y el botón para acceder a nuestro “perfil”:
Pop-up to access user's profile
Cuando se pulsa sobre el botón “perfil”, se accederá al perfil. Aquí, se tiene lo siguiente:
Información sobre el usuario (nombre, email y grupos a los que pertenece)
En la pestaña “actividad” se puede ver el registro de todas las acciones realizadas por el usuario en la plataforma.
En la pestaña “instalaciones” se pueden encontrar todas las instalaciones a las que tiene permisos de acceso ese usuario.
How to edit user's profile
Para poder editar el perfil del usuario es necesario pulsar sobre el botón de editar (icono lápiz) arriba a la derecha.
En esta sección podemos realizar las siguientes configuraciones sobre el perfil del usuario:
PERFIL: Datos básicos del usuario como son nombres, email y teléfono.
SEGURIDAD: Configuración de la contraseña de usuario.
PREFERENCIAS: Ajustes para visualización personalizada de la plataforma.
UBICACION: Ubicación del usuario.
INSTALACIONES: Instalaciones donde el usuario tiene permisos de acceso.
Elements when edit user's profile
Perfil
En esta sección se pueden configurar los siguientes campos del perfil de usuario:
USUARIO: es el nombre de usuario que se utiliza para el login en la plataforma. Este nombre es obligatorio que se rellene y ha de ser único. No pueden existir dos usuarios con el mismo nombre de usuario.
NOMBRE COMPLETO: Este campo se rellena con el nombre completo del usuario y su finalidad es meramente informativa para poder identificar más fácilmente cada usuario dentro de la plataforma.
CORREO ELECTRÓNICO: El correo electrónico es también un campo obligatorio y su función es poder recuperar la contraseña del usuario, así como poder recibir notificaciones de alarmas de la instalación.
TELÉFONO: Para ingresar el número de teléfono del usuario, primero es necesario identificar el país del usuario desplegando en menú con la bandera y seleccionando dicho país. De esta forma se rellenará automáticamente el prefijo de dicho país. El resto del número de teléfono se rellanará manualmente. El objetivo de este campo es poder recibir notificaciones SMS de alarmas de la plataforma.
HABILITAR: El botón “habilitado” sirve para habilitar y deshabilitar un usuario en la plataforma. Cualquier usuario que este deshabilitado tendrá el acceso denegado en la sección de login de la plataforma.
IMAGEN: El usuario puede subir una imagen para personalizar su usuario para ello es necesario, primero, eliminar la foto de perfil actual (rojo) y subir una nueva (naranja).
Change the image of the user's profile
Para subir una imagen, basta con arrastrarla al cuadro, o pulsar en el explorador de archivos para buscar una imagen.
Seguridad. Cambio de contraseña
En esta sección se puede modificar la contraseña actual. Para ello primero es necesario introducir la contraseña actual del usuario, acto seguido se debe introducir la nueva contraseña, y de nuevo, repetir la contraseña para comprobar que no ha habido un error al escribirla.
Security tab
Doble factor de seguridad
Existe la posibilidad de crear un doble factor de seguridad. Con el objetivo de verificar el inicio de sesión desde un dispositivo móvil. Al habilitarlo se abre la ventana de la imagen y se puede configurar fácilmente siguiendo el proceso que se muestra:
En el primer paso es necesario seleccionar el tipo de dispositivo donde se va a instalar y configurar el doble factor de seguridad.Double safety factor. Selecting device.
Una vez se ha seleccionado el dispositivo, la plataforma mostrará un código QR para descargar la aplicación para crear el doble password de acceso.Double safety factor. Download app.Double safety factor. Download app.
Finalmente, después de instalar la app en el dispositivo, se debe confirmar la configuración introduciendo el código de seguridad generado por la app instalada.Double safety factor. Activating and verifying the app.
Preferencias
En esta sección se puede configurar diferentes aspectos del usuario y de la interfaz en la plataforma.
Preference tab
Sesión de usuario. Permanecer siempre conectado
El primer lugar se permite elegir si se desea que la sesión esté siempre abierta cuando se accede desde un mismo navegador.
En caso de deshabilitar esta opción, se solicita el tiempo de inactividad, tras el cual se cerrará la sesión automáticamente. Por seguridad, lo recomendable es no habilitar la pestaña “Permanecer conectado”.
Configuration for the inactivity time
Time zone and visualization
Each user can be configured with a customized time zone, this time zone usually is related with the localization of the user. The use of the time zone in the platform apply when data of the graph is displayed, when the platform informs about events like alarms and notifications...etc.
However, the platform allow you to choose between two different configurations: data are shown related to the user's time zone or data are shown related to the facility time zone.
Number format
Here you can set how you want the numbering of the values shown on the platform to be displayed.
Language
This is the language of the platform displayed for this user. Once a language is selected, the entire platform and messages will be displayed in that language. However, if controls appear whose variables are not presented in the language set, it is because the creator of your library has not entered the translations before creating the control.
Main page
Here you can establish which will be the window that will be opened by default when logging into the platform. The options are as follows:
General view. When accessing the platform, we are shown the default home screen, which is the general view.
Alarms. We are redirected directly to the alarm section.
Facilities. Selecting this option we can indicate which installation we want to access when logging in.
Diagrams. By selecting this option we can indicate which diagram we want to access when logging in.
Controls. By selecting this option we can indicate which control we want to access when logging in.
Charts. By selecting this option we can indicate which chart we want to access when logging in.
Libraries. We are redirected to the library section.
Users and Groups. We are redirected to the users and groups section.


