Diferencia entre revisiones de «CONN kibox1A/en»
De wiki.kiconex
Página creada con «CONN kibox1A» |
Página creada con «The connection of a kiBox1A is graphically summarized with the following image. alt=KiBox1A connectivity|miniaturadeimage|KiBox1A connectivity|left] The caption is as follows:» |
||
| Línea 2: | Línea 2: | ||
The connection of a kiBox1A can be summarized in three parts: power supply, internet (via GSM network) and connection to the controller (with the RS485 port). | The connection of a kiBox1A can be summarized in three parts: power supply, internet (via GSM network) and connection to the controller (with the RS485 port). | ||
<div | <div class="mw-translate-fuzzy"> | ||
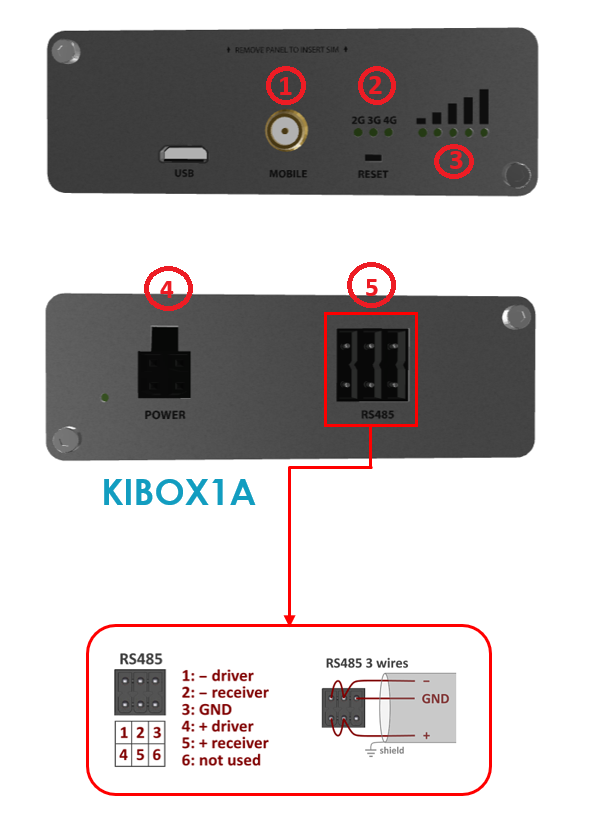
The connection of a kiBox1A is graphically summarized with the following image. | |||
[[ | [[File:Kibox1A connectivity.png|alt=KiBox1A connectivity|miniaturadeimage|KiBox1A connectivity|left]]] | ||
The caption is as follows: | |||
</div> | </div> | ||
# GSM coverage antenna connector. | |||
# | # 2g/3g/4g coverage indicator. | ||
# | # Coverage signal indicator: the signal quality can be checked through the LED indicators. If these indicators are off, it means that a SIM card is not detected or there is no coverage for the kiBox1A to work. | ||
# | # 9-30Vdc power connector. | ||
# | # RS485 port using ModBus RTU communications protocol. The control must be connected to the kiBox1A using a 2-wire shielded cable, connecting the shield to the GND pin (3). | ||
# | |||
== Más información == <!--T:12--> | == Más información == <!--T:12--> | ||
Revisión del 14:00 10 abr 2024
Kibox1A connection
The connection of a kiBox1A can be summarized in three parts: power supply, internet (via GSM network) and connection to the controller (with the RS485 port).
The connection of a kiBox1A is graphically summarized with the following image.

The caption is as follows:
- GSM coverage antenna connector.
- 2g/3g/4g coverage indicator.
- Coverage signal indicator: the signal quality can be checked through the LED indicators. If these indicators are off, it means that a SIM card is not detected or there is no coverage for the kiBox1A to work.
- 9-30Vdc power connector.
- RS485 port using ModBus RTU communications protocol. The control must be connected to the kiBox1A using a 2-wire shielded cable, connecting the shield to the GND pin (3).
Más información
En el caso de necesitar más información, tiene a su disposición:
- wiki de kiBox. Allí encontrará información específica del kiBox.
- wiki de kiconex. Es la wiki genérica, la cual puede ayudarle con todas las dudas que le surjan en variados temas relacionados con kiconex, sus productos y su plataforma.
