Diferencia entre revisiones de «QSG kiBox0/en»
De wiki.kiconex
Página creada con «== Hardware Installation ==» |
Página creada con «* Before working with kiBox0, it is necessary to prepare the installation of the drivers that will be connected to it. The controls are connected to the kibox via RJ45 cable to the LAN port. '''Note:''' '''RJ45 cable not included, optional to add to your order.''' miniaturadeimagen|600x600px|Conexión RJ45 Kibox0|centro *Insert SIM card into the card holder of your kibox. If the card has been purchased from Kiconex, it will come ready for conn…» |
||
| Línea 12: | Línea 12: | ||
== Hardware Installation == | == Hardware Installation == | ||
* Before working with kiBox0, it is necessary to prepare the installation of the drivers that will be connected to it. The controls are connected to the kibox via RJ45 cable to the LAN port. | |||
* | '''Note:''' '''RJ45 cable not included, optional to add to your order.''' | ||
''' | |||
[[Archivo:LAN ki0.png|miniaturadeimagen|600x600px|Conexión RJ45 Kibox0|centro]] | [[Archivo:LAN ki0.png|miniaturadeimagen|600x600px|Conexión RJ45 Kibox0|centro]] | ||
* | *Insert SIM card into the card holder of your kibox. If the card has been purchased from Kiconex, it will come ready for connection. | ||
[[Archivo:SIM.png|miniaturadeimagen|600x600px|Tarjetero SIM Kibox0|centro]] | [[Archivo:SIM.png|miniaturadeimagen|600x600px|Tarjetero SIM Kibox0|centro]] | ||
* | * Attach the antennas to your kibox. We recommend the use of two antennas to improve the quality of the GPRS signal received. | ||
[[Archivo:ANTENAS.png|miniaturadeimagen|600x600px|Conexión de antenas Kibox0|centro]] | [[Archivo:ANTENAS.png|miniaturadeimagen|600x600px|Conexión de antenas Kibox0|centro]] | ||
* | *Connect the power to the kibox. And connect to the electrical network as the last step. | ||
[[Archivo:POWER.png|miniaturadeimagen|600x600px|Conexión de alimentación|centro]] | [[Archivo:POWER.png|miniaturadeimagen|600x600px|Conexión de alimentación|centro]] | ||
* | * Access our website https://my.kiconex.com, enter your credentials (previous [[Newuser|registration]] is required) and click access. | ||
<div lang="es" dir="ltr" class="mw-content-ltr"> | <div lang="es" dir="ltr" class="mw-content-ltr"> | ||
Revisión del 10:12 27 may 2024
KiBox0 Quick Start Guide
The kiBox has been designed as a plug & play IoT device, thus facilitating their installation.
En esta guía, el usuario encontrará la información simplificada para poner en funcionamiento su kiBox0 y empezar a trabajar con él.
Hardware y dimensiones
En este enlace dispone de las especificaciones del producto.
Hardware Installation
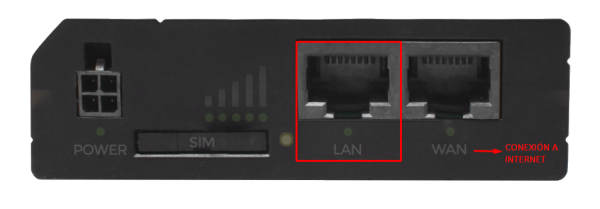
- Before working with kiBox0, it is necessary to prepare the installation of the drivers that will be connected to it. The controls are connected to the kibox via RJ45 cable to the LAN port.
Note: RJ45 cable not included, optional to add to your order.

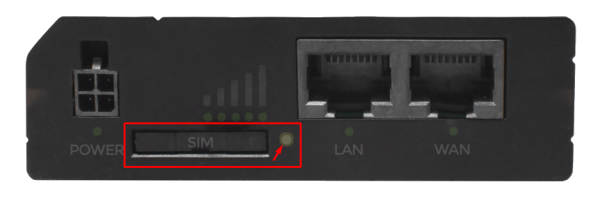
- Insert SIM card into the card holder of your kibox. If the card has been purchased from Kiconex, it will come ready for connection.

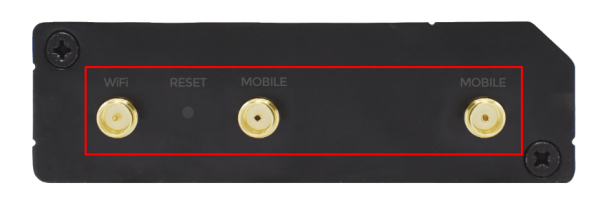
- Attach the antennas to your kibox. We recommend the use of two antennas to improve the quality of the GPRS signal received.

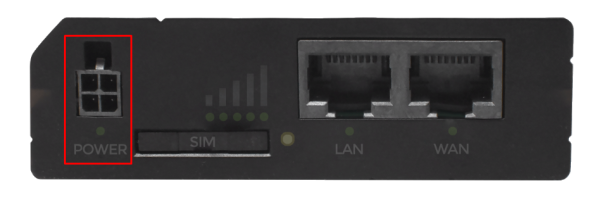
- Connect the power to the kibox. And connect to the electrical network as the last step.

- Access our website https://my.kiconex.com, enter your credentials (previous registration is required) and click access.
- Para continuar con la configuración de su instalación, acceda a Perfil de usuario o Instalaciones. Recomendamos la lectura de los demás apartados relacionados en MyKICONEX.

