KiAdmin/en
kiAdmin
kiAdmin is an administration interface available on kiBox 2, 4 and 8. In it the client will be able to manage the configuration of the equipment's network parameters (IP, gateway, proxy, etc.) in addition to being able to verify the device's connection to the Internet, with the server with kiconex and with the update VPN .
Access
Access to kiAdmin can be done through the IP 100.100.100.100. Each step is detailed below:
Computer connection
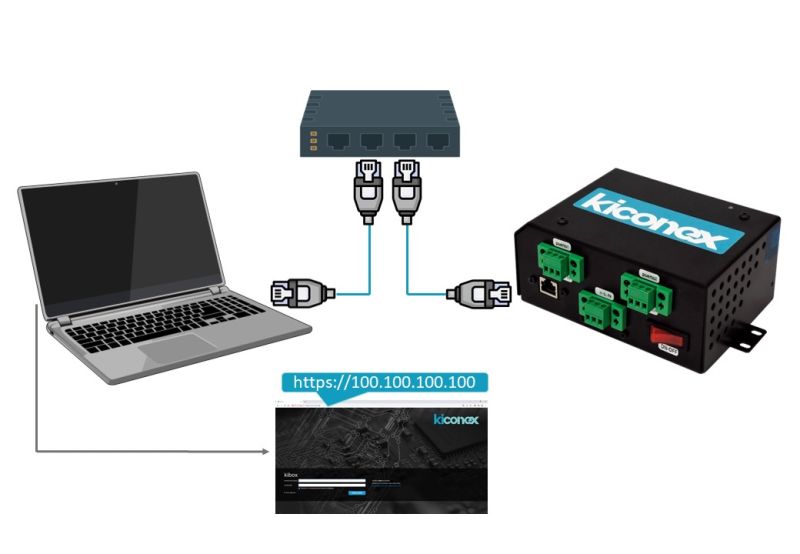
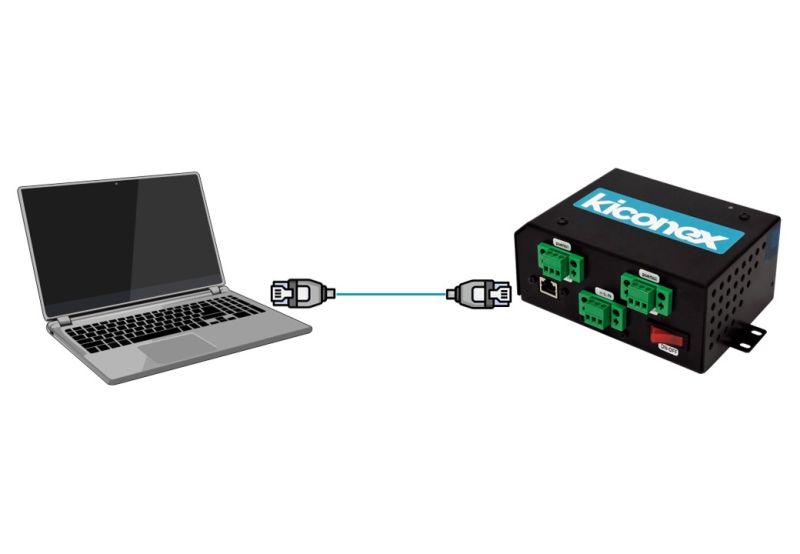
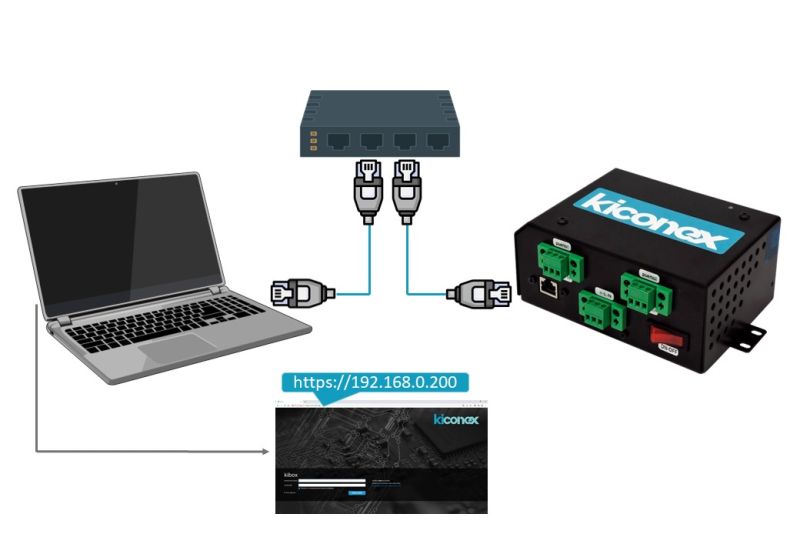
The computer with which you intend to access kiAdmin must be connected to the same network as the kiBox, either through a router or by direct connection to it. These images show both cases:
Computer Settings
If the kiBox connects directly to the PC, according to the image of option 2 in the previous section. It is necessary to configure the computer in the same IP range as the kiBox. The process for the Windows 10 operating system is detailed:
- Right click on the network icon, located on the right of the taskbar. Select the option "Open Network and Internet Settings".
- Click on "Change adapter options".
- Right click on the "Ethernet network adapter". Select "Properties".
- Double click on "Internet Protocol version 4 (TCP/IPv4)".
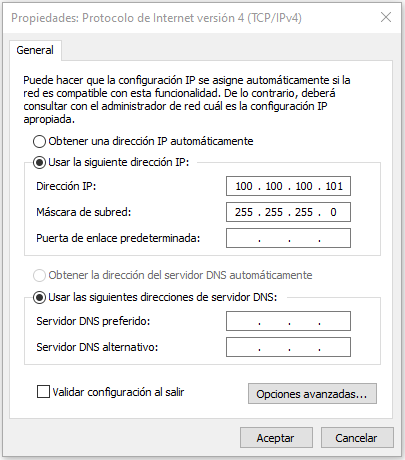
- Select the option "Use the following IP settings", enter the image settings and click "OK".
Access to the configuration portal
With the computer configured in the same IP range as the kiBox, you access the portal through your browser, typing the IP address 100.100.100.100 in the browser. The access credentials can be found in the documentation for your device.
It is necessary to activate the option "Reuse my password for privileged tasks".

Network Settings
'The kiBox are preconfigured in DHCP mode, so that your network server will be able to assign it an IP address automatically in the range it has available. If you want to assign a static IP, you must follow the following steps:
- Click on the network eth0

imagethumbnail - Next, click on the IPv4 Address. Initially the kiBox will be configured for dynamic IP assignment (DHCP).

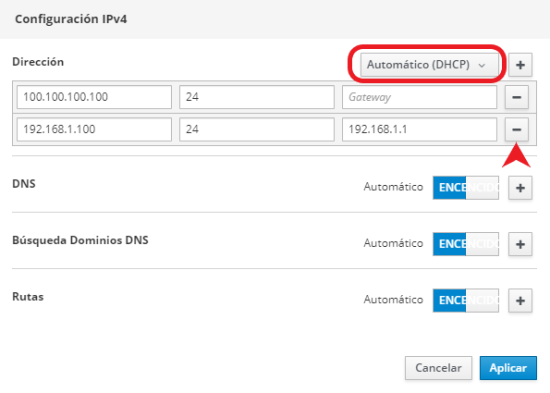
image thumbnail - In the pop-up that appears, change Automatic to Manual, press the "+" and add the desired IP address, as in the following image:[ [File:ES kiAdmin eth0 IPv4 Static.png|center|imagethumbnail|550x550px|Example of static IP address configuration.]]
NOTE: It is recommended not to modify the IP address 100.100.100.100 so as not to lose the possibility of accessing it again in the future.
The configuration shown in the image is an example, modify the values according to your needs. Once the process is complete, you must click Apply and you will be redirected to the previous page, where you can see the applied configuration.
To return to the DHCP configuration, you must undo the previously indicated changes: change the drop-down menu from Manual to Automatic (DHCP) and delete the assigned static IP by clicking on the "-" button.
After following the previous steps, you can disconnect the kiBox from the computer and connect it to the installation's router or switch. You can check that everything has gone well by following the following steps:
- Connect the kiBox to the router
- Connect the PC to the same router as the kiBox
- Access the kiAdmin interface through the IP that was configured in the kiBox.
This diagram shows the example of the previous case.
Function check
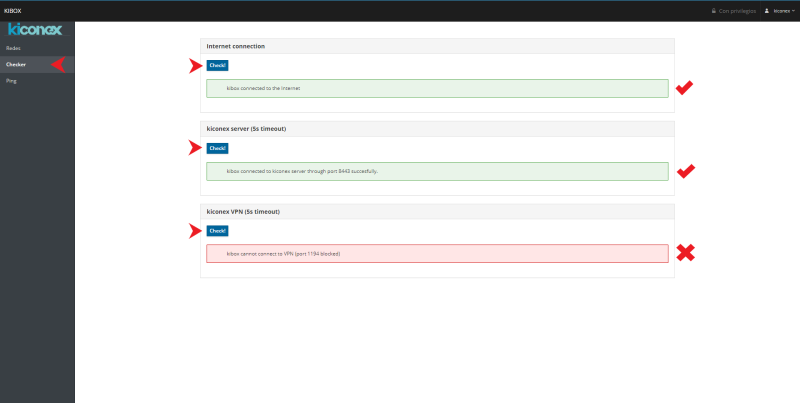
The kiAdmin interface allows you to carry out a series of checks thanks to the Checker and Ping tabs. For the kiBox to communicate with the server, it is important that the 3 tests in the Checker tab are carried out successfully. If the 3 tests are completed and the facility still does not appear as connected on the mykiconex platform, we recommend restarting the kiBox by turning it off, waiting 15 seconds and turning it back on. If the problem is still not resolved after the restart, you can contact our support team as indicated here.
Checker
The checker tab allows you to easily perform three tests to verify that the kiBox has communication with the kiconex servers.
- Verify that the kiBox has an Internet connection.
- Verify that port 8443 on the network is open to communicate with the server.
- Verify that port 1194 is open for the update VPN server.
Ping
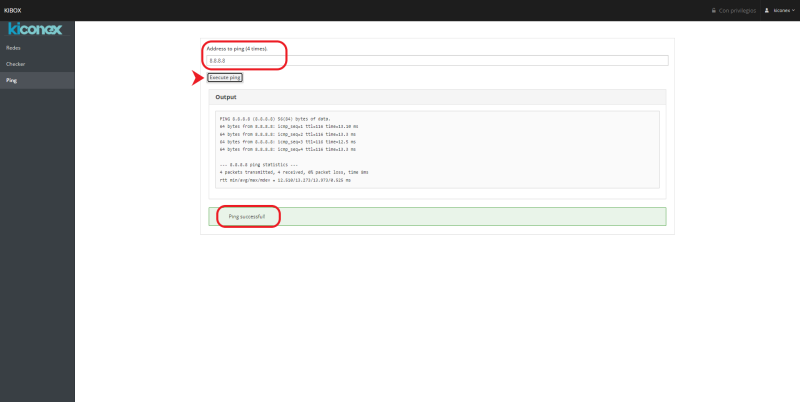
The ping tab is used to perform a connection test with other services or other devices on the same network as the kiBox, for example, Modbus TCP devices. You simply have to enter the device's IP address and click on "Execute Ping". The result of the request can be checked below, as shown in the following figure.
