MAN kibox2A/en
Kibox2A Manual
This page contains the user manual for Kibox2A devices.
Here you will find summaries of information about the available features and functions of your device.
Safety information
Operating conditions
- Operating temperature: -40° to +75° Celsius
- Humidity should be in the range of 10% to 90% (non-condensing). Use the device only in dry environments.
- Out of direct sunlight
- Away from heat source
- Away from corrosive substances, salts and flammable gases.
Caution: Operation outside the permitted range may significantly reduce the life of the device.
Defective and Damaged Products
- Do not attempt to disassemble the device or its accessories.
- Only qualified personnel should service or repair the device or its accessories.
- If your device or its accessories have been submerged in water, punctured, or subjected to a severe fall, do not use them until they have been inspected by our support department.
Electrical Safety
- Use only approved accessories.
- Do not connect to incompatible products or accessories.
Handling kibox2A
- The user is solely responsible for how he/she uses the device and for the consequences of its use.
- The use of the device is subject to safety measures designed to protect users and their environment.
- The user must always treat his/her device and its accessories with care; keeping them in a clean and dust-free place.
- Do not expose the device or its accessories to open flames or lit tobacco products.
- Do not expose the device or its accessories to liquids, moisture or high humidity.
- Do not drop, throw or attempt to bend the device or its accessories.
- Do not use harsh chemicals, cleaning solvents or sprays to clean the device or its accessories.
- Do not paint the device or its accessories.
- Do not attempt to disassemble the device or its accessories, only authorized personnel should do so.
- Do not use the device in a closed environment or where heat dissipation is poor.
- Prolonged use in such space described above may cause excessive heat and raise the ambient temperature, which will cause the device to automatically shut down or disconnect the mobile network connection for your safety. To resume normal use of the device after such shutdown, leave it in a well-ventilated place before turning it on.
- Consult local regulations for disposal of electronic products.
- Do not operate the device where ventilation is restricted.
- Do not use or install the device near water to avoid risk of fire or electric shock.
- Avoid exposing the equipment to rain or wet areas.
- Route the power and Ethernet cables so that they will not be stepped on and avoiding placing objects on them.
- Ensure that the voltage and current rating of the power supply match the requirements of the device. Do not connect the device to an inappropriate power source.
- Do not leave the device and its accessories within reach of small children or allow them to play with them. They could hurt themselves or others, or accidentally damage the device. The device contains small parts with sharp edges that may cause injury or could break off and create a choking hazard.
- This device, like any wireless device, operates using radio signals, which cannot guarantee connection under all conditions. Therefore, any wireless device should never be relied upon solely for emergency communications or used in situations where interruption of data connectivity could result in death, personal injury, property damage, loss of data, or other loss.
- The device may become hot during normal use.
Web User Interface
The kibox2A has a web user interface that allows you to change settings or view a general status of the device.
Login
To log in, you must connect to the kibox2A using an RJ45 ethernet cable from the LAN jack to the computer's ethernet port.
Access the kibox via web browser at the address http://192.168.0.1:8080. The credentials are written on the license plate of your device.
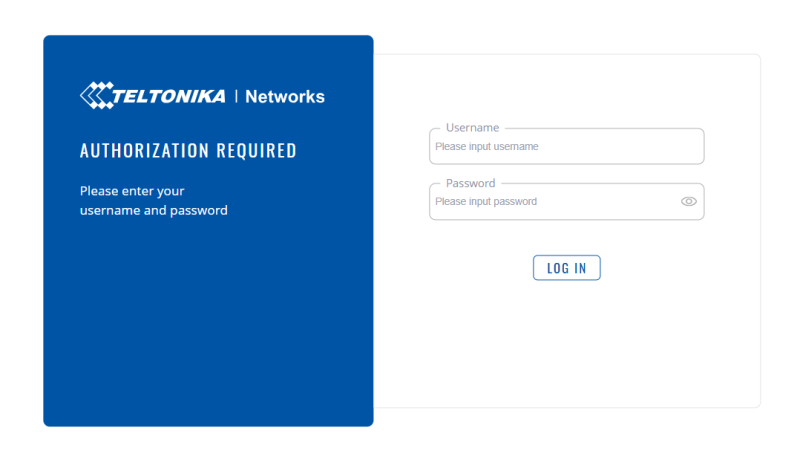
Can't log in because the page won't load?
In this case, you need to change your internet options.
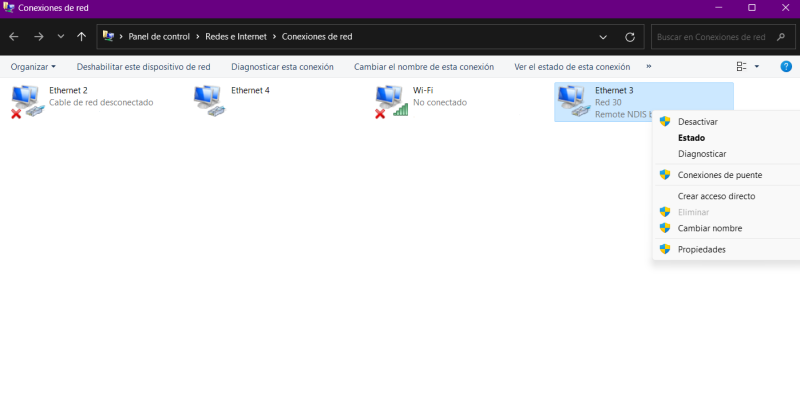
Navigate to Control Panel > Network and Internet > Network Connections.
Right click on the kibox (Ethernet X) and select "Properties".
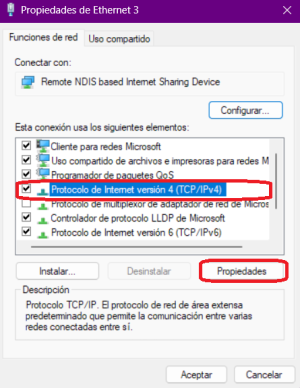
The following window appears. Select the fourth line "Internet Protocol Version 4 (TCP/IPv4)" and click on "Properties".
Enter the following data. As a note, the last digits of the "IP address" line can vary from 0 to 255. It is recommended to put a number between the range 100 and 150 to avoid conflicts.
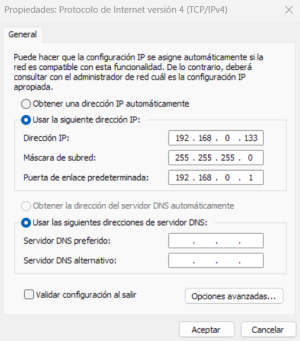
Once filled in as shown in the image, click on "OK". Close the following window. The IP is now configured to access the kibox and log in.
Status Tab
Overview
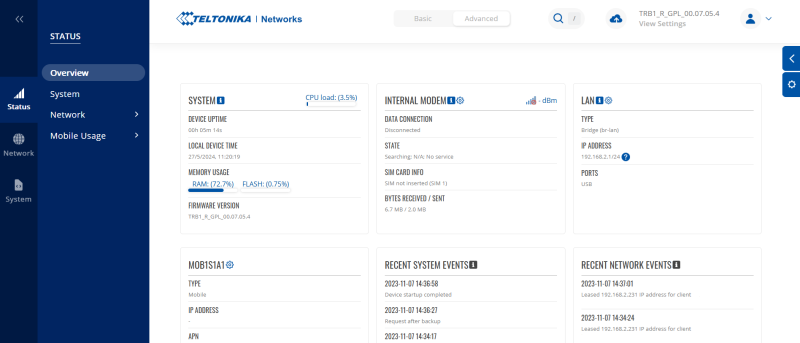
The Status tab displays the status of the device. It has a default overview where system data, modem data, LAN data, inserted SIM card data, recent system and network events are summarized.
System
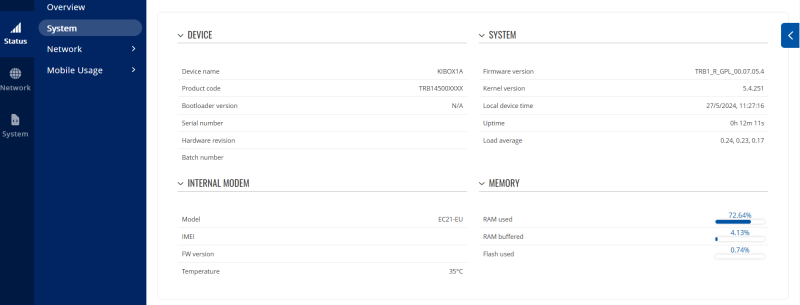
System status summary.
Network
Mobile
Mobile network status and inserted SIM card.
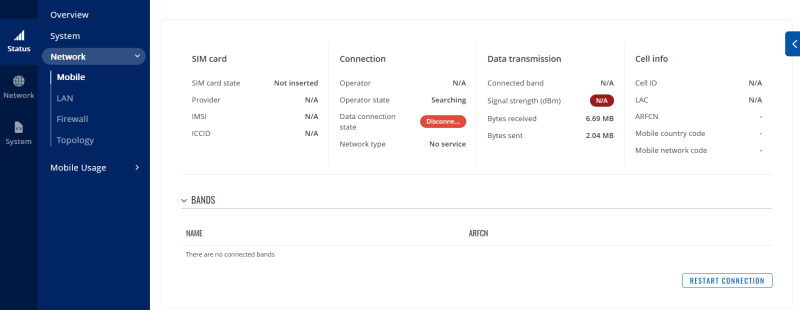
There is the logical option of restarting the kibox2A's internal modem without having to physically manipulate it. In this tab, in the lower right corner, there is the "RESTART CONNECTION" button which, when clicked, sends a reset signal to the device's internal modem.
Wireless
Interfaces
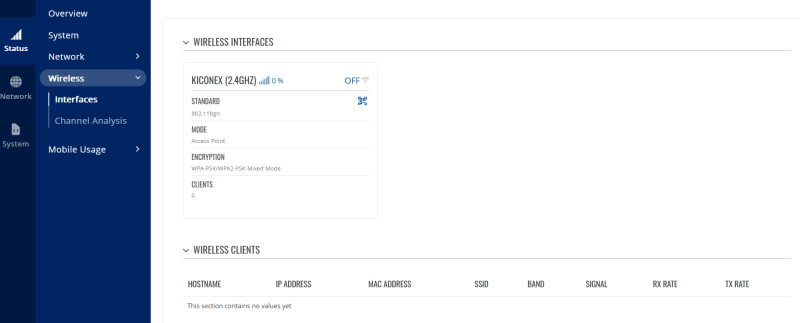
Shows the status of the wireless interfaces. Both the one generated by kibox2A itself and the ones connected to it.
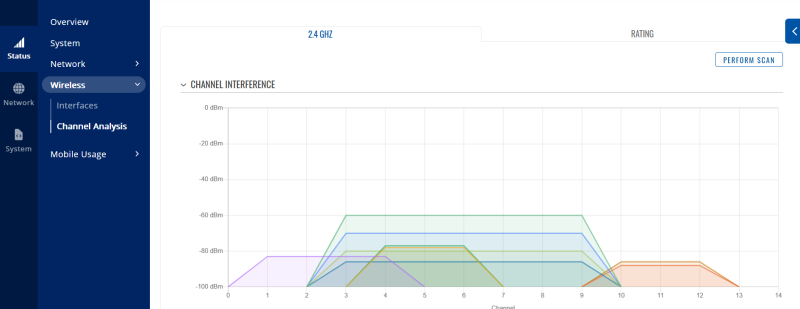
Channel Analysis
Displays a graph with an analytical scan of channel interference.
LAN
Data about the LAN status is obtained.

It is possible to assign a static IP via the web interface to a device connected to the kibox2A. To do this, simply choose the device you want to set as a static IP from the list of connected devices in "DHCP LEASES" and click on the "CREATE STATIC" button.
Firewall
Displays the status of the kibox2A firewall as well as additional information about the rows of the tables that appear in it.
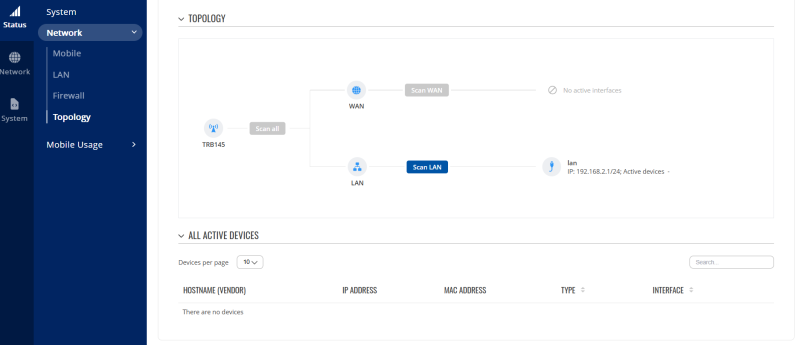
Topology
Graphically shows the connections made with the kibox2A.
Mobile Usage
This section shows the data usage in graph form by the SIM card inserted in our kibox2A. It has a drop-down menu that allows you to select the usage in days (Day), week (Week), monthly (Month) or total.

Network Tab
Tab for kibox2A network related settings.
It is strongly recommended that you do not make any modifications unless you are an advanced user or have networking knowledge.
Mobile
Settings relevant to the mobile network.
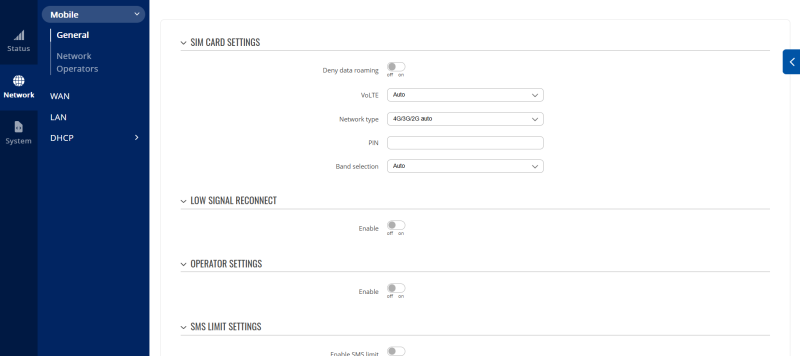
General
This section configures the SIM card if necessary as well as the optional function of reconnecting if the signal is low. It also has optional operator settings.
Network Operators
Kibox2A allows automatic or manual selection of a mobile network operator. This setting is available in this section.

WAN
If a more detailed configuration of the kibox is required to access the Internet, it is done from this section.

The interface that needs to be modified is edited by clicking on the pencil that appears on the right.
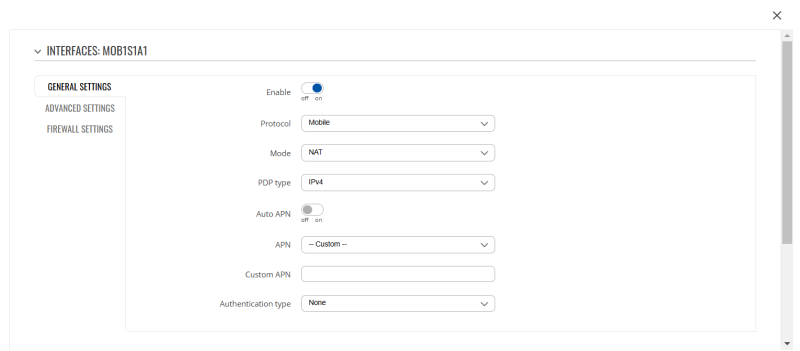
There are different and varied configurations that depend on the user in case they do not have an M2M rate contracted with Kiconex.
For customers with the M2M kiconex rate, these settings should be ignored as they are factory-prepared.
Note: Please note that for the kibox2A to be able to use the WAN configuration or interface shown in this section, it must be enabled (marked ON on the right).
LAN
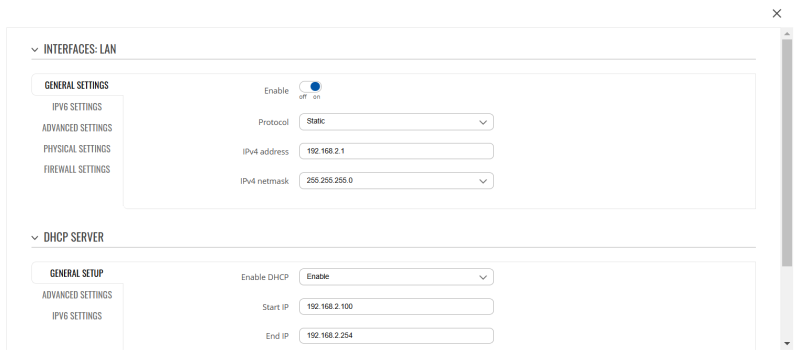
In the event that special configuration is required for the LAN interfaces, they are performed from this section.

Click on the pencil to the right of the LAN interface and a pop-up modal will open displaying the available settings.
DHCP - Static Leases
Section dedicated to assigning a fixed IP to the devices that connect to the kibox.

You must enter the MAC address of the device connected to the kibox, its local IP assigned with the kibox and a description for better recognition of the device.
Press the ADD button and save and apply the changes (SAVE & APPLY).
System Tab
Displays general system information. The kibox2A date cannot be changed. If you need to, please contact kiconex technical support.

User Settings
Section that allows you to change your user's password to access the kibox.

If you forget your password, you must contact kiconex technical support.
Reboot
This tab is used to send a reboot signal to the kibox. Note: this action will not delete any files or settings.
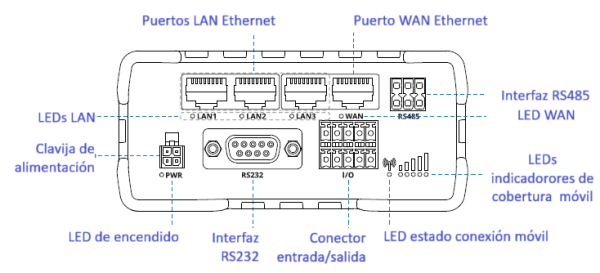
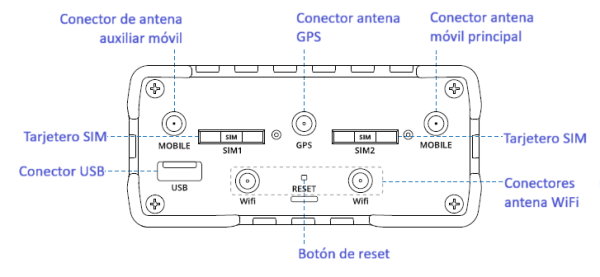
Front and rear panels

SIM Card
This section tells you how to correctly insert a SIM card into a kibox2A.
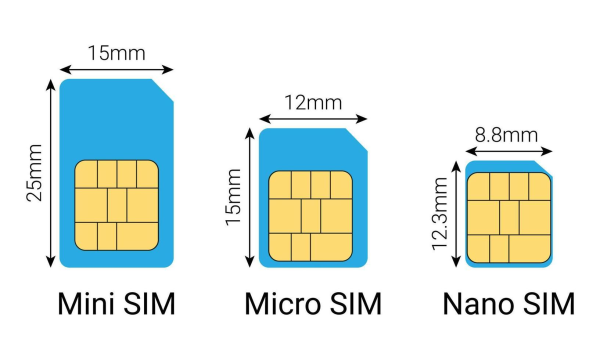
Before we start, it should be noted that the kibox2A is compatible with mini-SIM (2FF) sized cards. But since the different types of SIM cards have the same contact arrangement, smaller SIM cards can also be used with the router, provided they are inserted into a 2FF SIM card adapter . An overview of the sizes of the most popular SIM card types can be seen in the following figure:
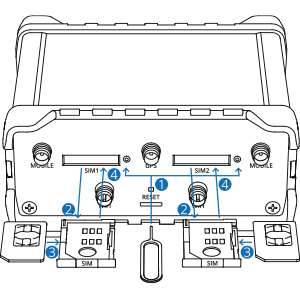
- Press the button on the SIM holder with the SIM needle.
- Remove the SIM card holder.
- Insert the SIM card into the newly removed holder.
- Slide and insert the SIM holder into the kibox2A card slot.
These steps must be repeated on SIM card holder 2 if you want to work with two different SIM cards on the same device.
