ModbusRTU-RS485
Modbus RTU-RS485 connection
The Modbus RTU protocol through RS485 connections is a standard widely used in industrial environments, since it allows the fluid and effective exchange of information over long distances. However, to avoid any possible interference and have completely stable communication, it is necessary that the buses meet a series of requirements that are detailed on this page.
Wiring requirements
- Use a halogen-free 3-wire shielded cable that provides protection against interference in Modbus RTU communication.
- Distance of at least 20cm from power lines.
- Respect the polarity of each RS485 connection
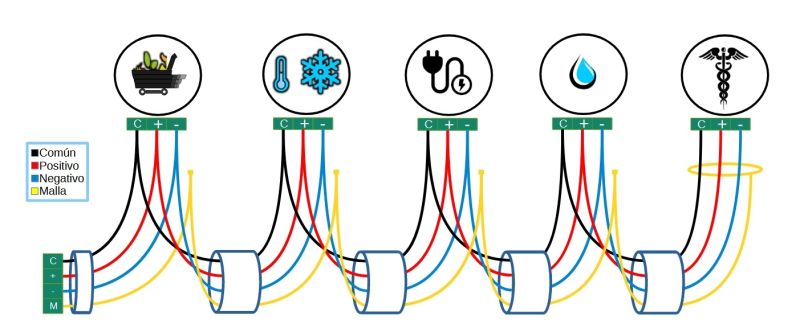
- Connection between devices following a daisy-chain topology, as shown in the following image:

- Common: if there is a connection for a common cable, a cable will come out of the terminal block (or kibox) that will go from the common to the common of the first control. It is connected to the common and from there a splice comes out to the next control. The operation must be repeated as many controls are going to be connected together in the same port. The common will 'die' at the last control in the series.
- + positive: A cable will come out of the terminal block (or kibox, depending on whether there is a kiconex electrical panel) that will go from the positive to the positive of the first control. It is connected to the positive and from there a splice goes out to the next control. The operation must be repeated as many controls are going to be connected together in the same port. The common will 'die' at the last control in the series.
- - negative: A cable will come out of the terminal block (or kibox, depending on whether there is a kiconex electrical panel) that will go from the negative to the negative of the first control. It is connected to the negative and from there a splice goes out to the next control. The operation must be repeated as many controls are going to be connected together in the same port. The common will 'die' at the last control in the series.
- GND ground without kiconex electrical panel: the mesh (the covering of the shielded cable) will be connected to the ground of the installation. Between the controls connected in series, the shield must be connected to each other. It will 'die' in the last control.
- GND ground with kiconex electrical panel: from the GND terminal block the shield of the shielded cable is connected. The other end must be connected to the shield of the shielded cable of the next control connected in series. The shield will 'die' in the last control.
Characteristics that define Modbus RTU communication
Every control that connects to a Modbus RTU network with an RS485 connector has a series of characteristics or configurations that allow it to communicate through said protocol:
- A unique Modbus address and different from the rest of the controls connected on the same line. The address value is set between 1 and 247.
- A communication configuration, which must be the same as all the controls connected on that line. Depending on the model and manufacturer of the control, this configuration is static or configurable through parameters. By consulting the manufacturer's manual you can verify this information. The communication configuration variables are:
- Speed or baudrate: 9600bps, 19200bps, etc.
- Data bits: 7 or 8
- Parity bits: none, even or odd
- Stop bits: 1 or 2
Steps in connecting RS485 lines with kiconex
1 - Plan how the controls will be distributed between the different RS485 ports available on the kiBox. The page about facility planning explains this. It is important to take into account the characteristics of the Modbus protocol when making this plan. The following table is indicative when establishing said planning:
| NAME OF THE TEAM | RS485 PORT | MODBUS ADDRESS |
|---|---|---|
| Control identifier | Depending on the kiBox model, up to 4 | Values from 1 to 247 |
2 - Connect as many buses or shielded cables as RS485 ports have been planned, each of these buses must follow the wiring requirements above.
3 - Configure manually in each control the Modbus address planned in point 1.
4 - Verify that all Modbus buses have been set correctly by performing a checking.
5 - Connect the buses to their respective RS485 ports on the kiBox, access myKiconex and begin operating the remote facility.
Connection example
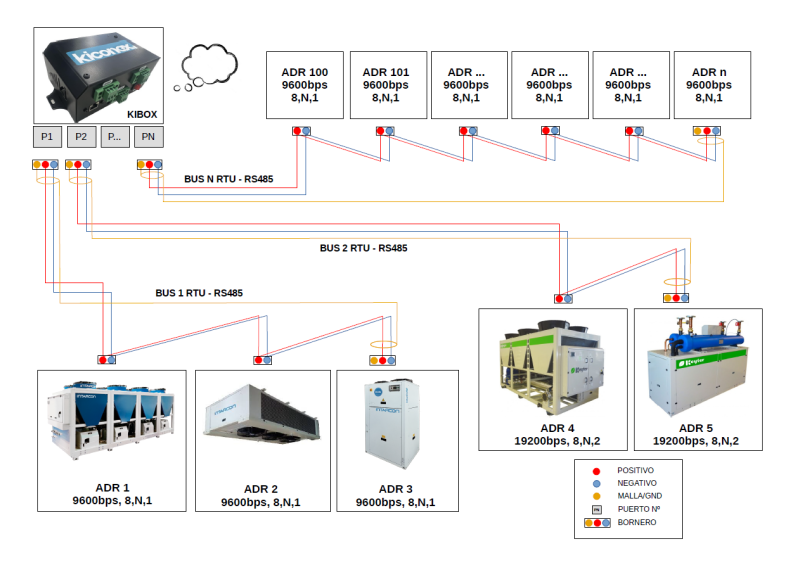
The image below represents an example of a generic connection where they are connected:
- 3 Intarcon brand machines
- 2 Keyter brand machines
- N generic thermostats
In this example, the steps for connection section would look like this:
1 - Equipment distribution: equipment distribution is carried out based on its RS485 configuration
- Intarcon devices: speed 9600, parity bits none, stop bits 1: 9600,8N1
- Keyter equipment: speed 19200, parity bits none, stop bits 2: 19200,8N2
- Generic thermostats: speed 9600, parity bits none, stop bits 1: 9600,8N1
| NAME OF THE DEVICE | RS485 PORT | MODBUS ADDRESS |
|---|---|---|
| Chiller 1 | 1 | 1 |
| Evaporator | 1 | 2 |
| Chiller 2 | 1 | 3 |
| Air conditioner 1 | 2 | 4 |
| Air conditioner 2 | 2 | 5 |
| Term. room 1 | N | 100 |
| Term. room 2 | N | 101 |
| ... | ... | ... |
| Term. room N | N | N |
2 - Bus 1 is connected with the Intarcon equipment to port 1 and bus 2 to port 2. In the case of bus N, it is connected to its respective port, with the N equipment that is connected.
3 - The Modbus addresses in the "MODBUS ADDRESS" column are configured on the display of each machine.
4 - Verify that each cable line is correct, using a multimeter, according to the instructions on the page checking the RS485 line .
5 - You access the platform myKiconex and begin to see information.

