In this section you will find how you can customize the interface just for an certain user in order to adapt to its languages, region, number declaration,...etc. This section also indicates how to set the user's security.
Once you have logged in into the platform, you will have a view similar to the following:
Main page
To access to the user's profile, click on the username located at the top right of the screen:
How to access to user's profile
Clicking on that, a pop-up windows will bring up. In this window, you will have the option to exit or log out, and the button to access the profile:
Pop-up to access user's profile
When you click on the “profile” button, you will access to the profile section. Here, you have the following subsections:
Information about the user (name, email and groups to which it belongs)
In the “activity” tab you can see the record of all the actions carried out by the user on the platform.
In the “facilities” tab you can find all the facilities to which that user has access permissions.
How to edit user's profile
In order to edit the user's profile, it is necessary to click on the edit button (pencil icon) at the top right.
In this section we can make the following settings on the user profile:
PROFILE: Basic user data such as names, email and telephone.
SECURITY: Configuration of the user password
PREFERENCES: Settings for personalized viewing of the platform.
LOCATION: User location
FACILITIES: Facilities where the user has access permissions.
Elements when edit user's profile
Profile
In this section the following user profile fields can be configured:
USER: is the username used to login into the platform. This name is required to be filled in and must be unique. There cannot be two users with the same username.
FULL NAME: This field is filled in with the user's full name and its purpose is merely informative in order to more easily identify each user within the platform.
E-MAIL: The email is also a required field and its function is to be able to recover the user's password, as well as to be able to receive alarm notifications from the platform.
TELEPHONE: To enter the user's telephone number, it is first necessary to identify the user's country by displaying the menu with the flag and selecting the country. This will automatically fill in the prefix of that country. The rest of the phone number will be filled in manually. The purpose of this field is to be able to receive SMS notifications of platform alarms.
ENABLED: The “enabled” button is used to enable and disable a user on the platform. Any user that is disabled will have access denied in the login section of the platform.
IMAGE: The user can upload an image to personalize his user. To do so, it is first necessary to delete the current profile picture (red) and upload a new one (orange).
Change the image of the user's profile
To upload an image, simply drag and drop an image into the box, or click in the file browser to browse for an image.
Security. User's password
In this section you can modify the current password. To do this, it is first necessary to enter the user's current password, then the new password must be entered, and again, repeat the password to verify that there has not been an error when writing it.
Security tab
Double safety factor
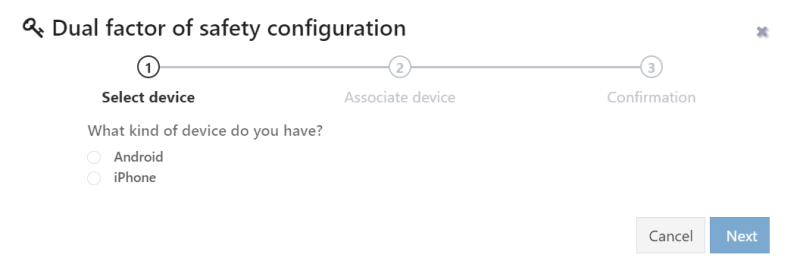
There is the possibility of creating a double safety factor, in order to verify the login from a mobile device. You can enable this featuring just clicking on google authenticator switch and can be easily configured by following these three steps:
In the first step you need to select which is the device to use in order to configure the double safety factorDouble safety factor. Selecting device.
Once you have selected a device, the platform show you a QR to download the app to create the double passwordDouble safety factor. Download app.Double safety factor. Download app.
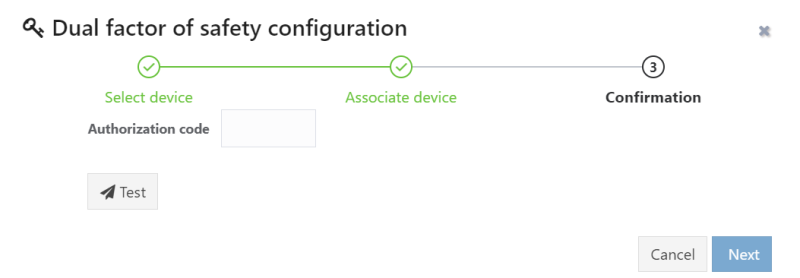
Finally, after installing the app in your device you can confirm the configuration using an authorization code generated by the appDouble safety factor. Activating and verifying the app.
Preferences
In this section you can configure different aspects of the user and the interface of the platform.
Preference tab
User session. Stay always logged in
The first place allows you to choose whether you want the session to be always open when accessing from the same browser.
In case of disabling this option, the inactivity time is requested, after which the session will be closed automatically. We strongly recommend to use configure an inactivity time in order to improve the security of the platform.
Configuration for the inactivity time
Time zone and visualization
Every user can configure his own time zone. The use of this in the platform is necessary to display graphics located in time, as well as to notify alarms at the correct time. In addition, the platform allows the user to define whether he wants the time to be taken into account to be that of the installation or that of the user himself.
Numeric format
Specifies how you want to display the numeric value: comma or decimal point and thousands separator.
Language
Selection of the platform display language. Once a language is selected, the entire platform and messages will be displayed in that language. However, if controls appear whose variables are not displayed in the set language, it is because the creator of your library has not entered the translations before creating the control.
Main page
In mykiconex you can also define which page will be opened by default when accessing the platform. The options are as follows:
General view. When accessing the platform, we are shown the default home screen, which is the general view.
Alarms. We are redirected directly to the alarm section.
Facilities. Selecting this option we can indicate which installation we want to access when logging in.
Diagrams. By selecting this option we can indicate which diagram we want to access when logging in.
Controls. By selecting this option we can indicate which control we want to access when logging in.
Charts. By selecting this option we can indicate which chart we want to access when logging in.
Libraries. We are redirected to the library section.
Users and Groups. We are redirected to the users and groups section.
Location
A latitude and longitude can be set to locate the user on the map, which makes it easy to quickly know where users operate from, which, by nature of the facilities, can be seen.
This is a manually set location, not synchronized and automatically updated via the smartphone's GPS. The format in which the latitude and longitude data is entered must be with decimal point, as extracted from Google Maps. An example is shown in the following image:
User location.
Facilities
From this tab, you can view those facilities to which you have access.


